Thursday, 16 June 2022

Battle of Southam - 24 August 1642 - 28mm Pike and Shotte Rules


It's not often that I do write ups of the games I play.  I think its more to do with the fact that I don't really take photos all the way through the game to create a good narrative.  I also forget what happened! It's also considerably easier and less time consuming to show painted figures instead.  

However, I should really do more write ups, if only to remember the really great games that I played.

The battle that Ian and I played the other week was from the excellent series of scenario books produced by Caliver Books entitled 'English Civil War Gaming Scenarios'. This battle is from Volume 3 by Robert Giglio.  The books are excellent in that the scenarios are transferable to any set of ECW rules and the information contained within is just excellent.

This battle looked interesting for several reasons. Not least because it was actually before Edgehill, and its not really that well known. The armies are a mix of troop types and it is not totally equal.  One side is stronger in infantry but weaker in cavalry.  Both sides are largely raw troops too...so care needs to be taken to avoid units breaking too soon.

The above image shows the start dispositions.  The horse units on the furthest end have been labelled as 'wings' for image space.  The Royalists have the River Itchen and bridge to their rear. The road runs from Coventry, behind the Royalists towards Southam, behind the Parliament army.


Above we have the Royalist foote unit of the Earl of Northampton's Regiment (though it is actually painted up as a Cornish Regiment with possible flag colours - there can't be many ECW wargaming armies with correct flags throughout!).  Stand-in units playing the part of the historical unit are going to be seen throughout this blog post..so ignore the flags!  I think only my Northampton's Horse regiment has the correct flag.


A view from behind the Royalist right wing. These cavalry troops are from the Redoubt Enterprises range which still look good, but when they came out nearly 30 years ago, were just incredible.


Still behind the Royalist lines. The light gun and Saville's Dragoons get ready in the Royalist Centre.


View from behind the Royalist Left. The cavalry are a mix of Redoubt and Bicorne figures.  This Royalist wing refused all orders to make it move throughout the entire game!)


The left half of the Parliament army arrayed above.


Another overview shot


A close up of fine Bicorne Miniatures cavalry


A rare sight, some of the English Civil War cavalry produced by Front Rank (closest to camera).  I painted these in around 1991. They have been re-based several time but they have held up well to the decades.  The Royalist cavalry have the better of the fight on their right and push break the Parliamentarians. Above, the reserve Parliament line attempts to make a charge to hold back the tide.


On the Parliament right, things should have gone much better. The Royalist cavalry they were facing consistently disobeyed the orders they receive to charge.  As my Parliament cavalry wing receive the order to advance to take advantage, they 'blunder' their order and move off to their left oblique to stand in front of my infantry.  This was not the 'infantry protection' movement that they were intended to make...someone blundered for sure!


A view of Northampton's Infantry from the point end.  Figures are Bicorne with possibly some of the old Renegade troops mixed in.


With my left wing of horse routing and my right blundering, it was down to the infantry to save the day. my Parliament army was stronger in Infantry so I had to make use of it. I decided to advance down the hill and attack.  Unfortunately the cavalry blunder blocked my infantry from moving, except for Col Denzil Holles's Regiment.  A raw regiment but imbued with courage (or imbued with something!)

It was a bloody affair.  The red marker shows they unit has become spent and the cotton wool smoke is disorder.  The Royalist light gun and infantry fire poured a deadly fire into Holles's men.  It was too much for them and alas they discarded their arms and broke and ran.


That was effectively the end of the battle. My narration makes it seem short but the game lasted a few hours and several game turns (we chat lots too!).  It played like many of the smaller battles of the Civil War historically seemed to.  Raw troops fighting with major collapses once things start going wrong.


With one broken cavalry wing and my Infantry brigade with most of its units spent, this meant that 2 of the 3 brigades were counted as beaten, so the last brigade had no choice but to turn tail and flee.


All in all it was a great game and made me wonder how 3 years could go by without playing one of my favourite periods (and probably with my biggest collection).  The game played well and it was brilliant to read about and play another battle in a war that set the whole area around where I live between Oxford and Burford, ablaze with battles, sieges and skirmishes.

In the actual historical battle, it appears that Colonel John Hampden's Parliament regiment made a determined assault down the hill, with the light guns advancing and firing to support with grapeshot at close range, causing the Royalists to break and flee (offering to sell their weapons in the nearby townes 'for 12 pence a peece'). So in history it was a Parliamentarian victory.

I look forward to playing more Civil War games soon, though with the arrival of hot weather, my mind often wanders to the Western Deserts of WW2...

Wednesday, 1 June 2022

28mm Greek Casualties - Wargames Foundry


Not the most delightful of figure types, but for fitting in with the battlefield and avoiding obstructive markers, these are a necessity.  Here we have casualties for Ancient Greece.


These are Wargames Foundry figures, which have stood the test of time very well indeed.  They were just what I needed for the inevitable casualty/strength record keeping that is an essential in our particular hobby.

These are based with 'Hail Caesar' rules in mind, with the left hand dial keeping track of the unit 'Stamina' level and the dice square on the right to keep a track of the excess casualties which will need to be checked on break tests. 

The figures are up to the usual standard of Foundry. You do tend to know what you are getting with Foundry (except with some of their weird 18th century figures with odd square chins) and these are excellent.


I didn't want anything too gory, there is no extra red paint splashed about on these! So these are perfect.

Some Spartans are also mixed in and these are very effective too.


The shield transfers are a mix - I can't recall which company did the Spartan transfers but the remainder are from Little Big Man studios.

The dial turning casualty bases are from Warbases, as are the dice squares.  I bought a huge batch of these bases in 2013 (yes I actually still have the receipt!) but have  recently used the last one up.  I ordered a good number more the other week and was shocked to find nearly half of the dials did not turn.  

I have to hand it to Warbases, as soon as I told them, they sent more out to me and they will be receiving the sticking ones back to see what caused the glues to jam movement.  Hopefully their 'post-mortem' of the stands will sort the problem out.  I do like good customer service.


Overall I am very pleased with the way these have turned out.  These 21 bases took me a couple of weeks to paint and prior to that I was painting Union and Confederate dead on dial turning bases too.  More than a month of painting dead figures has left me a bit jaded though. I feel like painting something a bit more alive now.


Hopefully this will keep me going for a couple of decades.  The way I hop about between time periods it will probably be months/years before I do anymore Greeks - though I am awaiting an order of Spartans from Victrix.  I just need to get some more command stands painted up and then I can declare my Greek armies to be of a properly playable state..I just need more units now though!

Friday, 13 May 2022

Dark Age Buildings - Part 3

 Only two more buildings to go, so I thought I would include these so they were not left out.  These are great as they are livestock buildings, so a little different to the dwellings that I have painted and posted previously.

Building 6


Building 7


I'm delighted with these building and I do have a use for them, being used primarily for Dux Britanniarum rules by the Too Fat Lardies.  These will play a crucial role. I would also like to play some of the lesser known Dark Age battles such as the one at Nether Wallop near Winchester in Hampshire UK.  This was also known as the Battle of Guoloph.  The only issue will be the Order of Battle, the terrain and the exact location...but hey, we are wargamers, since when has that ever stopped us! 

On a different topic, I have received my massive parcel of Medieval buildings now from Grand Manner. These are all from the magnificent unpainted limited sale from earlier in the year. To say they have been lovingly individually packed is an understatement.  They are clearly very customer service focussed as they were determined that they arrived in a superb undamaged state.  I have not finished unpacking them yet, but my goodness, they look superb!  The Battle of St Albans and many others including English Civil War, will be played out with these new buildings...when I get around to painting them!  First of all, I really need to paint some soldiers! 

Tuesday, 26 April 2022

Dark Age Buildings Part 2


A few more snaps of my Dark Age buildings made by Grand Manner, continued from my last post.  All of these are 28mm resin buildings.


Building Three - Small Dark Age dwelling thatched -timber and daub

There is a joy in trying techniques and then trying to add a few more refinements.  There is a muted-ness (is that a word?) in the colours used on these houses.  With the flakes of wattle and daub coming away there is an element of decay in these houses. An honest peasant sort of house with this being totally unassuming.  Airey, spacious with rustic charm, all terms that modern real estate people might call it.  

I know it was just fun to paint, and make it look lived in and blending in with the environment over time.  I imagine that the wafts of smoke from the open hearths would be the first thing that an approaching traveller might see, rather than the houses themselves which would blend in so well to the landscape.

Many of the colours used in all of the buildings were the same paints, but I tried very subtle differences just so they did not all look the same.


Building Four - Dark Age Medium Thatched Dwelling

This is one for the more upwardly mobile sort of peasant.  The porch must have been the social equivalent then of having a Ford Mustang in the drive.

Again I love the little touches that Grand Manner added.  The heavy fabric curtains, allowing an element of colour, the axe outside ready for more of the frequent log-chopping for the hearth.

This building is wood panelled throughout and I really was unsure initially how best to go about this. Again I decided that deep browns were not the way forward, leaning instead towards buffs and greys.

The internal details were a joy to paint.  The top shelf of the shelf unit was a detached item that was glued on after the lower shelf contents were painted.  This was a great idea and gave more space to wield the brush. It was fun painting the contents of the food baskets. I can't recall ever doing anything quite like that before!


Building 5 - Medium Dark Age Dwelling Thatched - Timber and Daub

Another simpler type of house but still enjoyable to paint. I was glad to finish these. I found I got engrossed in the detail and the temptation to keep adding more was ever present. 

Amazing to see that wood panel floors are back in again in popularity, a timeless classic look!


Just some animal pens to go in the next post.  These houses were great things to do as a different sort of project.  I didn't feel like painting intricate figures last week and I also wanted to practice my techniques as I also ordered a medieval town set just before the Grand Manner unpainted buildings offer expired.  These should arrive tomorrow!  


Sunday, 24 April 2022

Dark Ages or Early Medieval Buildings - 28mm Grand Manner


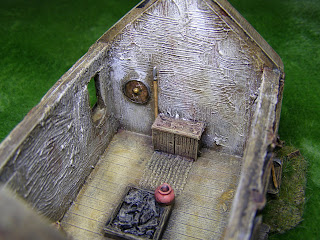
The wanderer returns!  It's been a busy few months but hopefully normality is back. The first thing I have done since my return is to paint some Dark Age buildings...or early medieval, as it now seems to be called.

My intention for doing this was primarily for using them for the 'Dux Britanniarum' Rules.  I had play tested them but without using any objectives and found this was not fair on the rules. It really needed something to add the drama and purpose to the combats.  Hence a village.

The buildings are by Grand Manner, and I have long coveted owning some of their fine models. Alas the price was always beyond me.  I am one of those wargamers who has always been happy to invest in troops but rarely on terrain pieces.  This is changing for me now, I am glad to say. However, I noticed several months ago that Grand Manner were selling unpainted resin models for a limited period.   It was an offer too good to miss!  So I bought 7 buildings of various sorts.

Building One - 'A' Frame House


I would not class myself as a terrain modeller. I tend to stick with model soldiers, planes and vehicles. That kind of thing is in my comfort zone. I have had a go at scratch building bits and have done some building painting, but I always considered it passable rather than good.


I wanted to make a real effort on these.  One thing that helped was the very clear definition of the superb casting.  I realised that with washes and dry brushing I could probably get a good effect.    I set about studying as many real thatched buildings and model buildings on line.  One thing that was  apparent was how cut wood isn't really brown. It is almost anything but, but I think we tend to be used to seeing shades of browns with our modern shed paints.


So following some minor de-flashing, and washing, I applied a Vallejo Burnt Umber undercoat and off I went!  My method really involved applying lighter and lighter shades and then an Army painter wash or several and then re-highlighting.  This proved to be very effective.  


I really liked the small details in the houses that can be seen inside. These are all part of the wonderful resin casting and not something that I have added afterwards.

Building Two  - Wattle and Daub Store Hut

All of the buildings have so much character and were great fun to try techniques out on.  This store hut looked like it had seen better days, so I tried to find ways of ageing it.


The Army painter washes were great to apply to reduce some of the whiteness and introduce decay  to it.


I'll post the buildings in several parts as I seem to have to post one picture at time or they all go in reverse order. There must be a better way of posting pics.


Anyway,  I'll leave these for now and continue shortly (without a gap of 4 months this time!)