Friday 27 November 2020

British Chindits WW2 - 28mm - Warlord Games

The random nature of my posts continues!  This time we have Chindits from the WW2 Burma campaign.

Since preparing my WW1 collection and getting it ready for playing with Chain of Command, I found myself also getting interested in the idea of a Far East campaign for WW2.  I must confess that one area of WW2 that I know least about is the Burma campaign, having focussed so much on Normandy and North Africa.   I feel I have neglected knowing the detail of battles in other theatres.

Having once spent 7 months in the jungles of Belize (though a pale shadow of the difficulties of Burma in the monsoons), I think I have always been put off by the thought of creating jungle terrain.  Though like so much else, if one puts ones mind to it there are ways and means of representing things without having to go to excessive lengths.

What really sparked this purchase was reading the memoirs written by the famous author of the 'Flashman' and McAuslan and many other excellent works.  George MacDonald Fraser's book 'Quartered Safe Out Here' is about his experiences as a rifleman in the Kings Own Border Regiment and is probably one of the best memoir books I have ever read.  This inspiration prompted me to want to learn more and so I found myself looking at wargaming figures.


I painted and finished these in about a week.  I found these to be very different to my usual fare of brightly coloured coats and lace and it was interesting to research the colours used and look at photos in books and online.

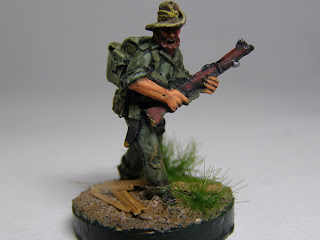
The figure below has an accidental tattoo on his forearm. A stray bristle had applied paint to his forearm and it actually made for a realistic tattoo, which I didn't spot until I enlarged this photo!  Such things being popular among servicemen even then, I shall probably keep the tattoo on him.  I might try to improve it further.

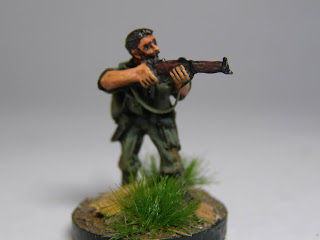
The Warlord Games Chindit Section comes in a box of 10 metal figures.  They were quite well cast with not too much flash. I was disappointed to find that one soldier's M1 carbine was without a barrel and then I heard it rattling in the box.  This took some gluing back!  It involved 'Greenstuff' modelling putty and then trying to disguise the new shape on the M1 fore-end...pics are further down.


I liked the variety of the kit carried, the poses and the demeanour of the troops.  It was good to see Kukris and machetes being carried and extra water bottles.  Some thought had clearly been put into to these.

Small niggles are that I think the SMLE's are slightly too short and that some heads seem to be a bit narrow (rather like some of the old Redoubt figures).  The Bren gunner appears afflicted like this. 

There was a near complete absence of slings on the figures. This, it could be argued, was because the men would have taken the slings off to move through the jungle.  However, personal experience of carrying small arms through jungle would lead me to believe that slings would stay on. Far easier to hack through jungle with a heavy blade if your rifle is slung. Most of the work is going to be arduous marching, dragging kit and fellow troops across unexpected rivers and up muddy slopes, or even pulling mules as in the Chindits case.  I rectified the sling situation with strips of paper with PVA white glue painted on to strengthen them, followed by painting in webbing colours.

The figure below appears to have his sling cast on and pulled short and tight over the magazine and under his hands, which I thought was ok, so I didn't add one on here.  Making slings was fiddly anyway!


Below we see one figure with an M1 Carbine. This is the one that arrived broken.  To attempt to disguise the bulge of modelling putty, I made a sling which had clearly looped itself over the fore-end. with this feasible excuse the eye seemed to forgive the awkwardness. It was certainly better than a missing barrel at any rate.

Once I had made the sling for this figure, I decided to do it for the rest of the section too.


One of my overwhelming memories of living and patrolling in jungle was the mud. Rotting vegetation and mud, and I imagine that Burma would have it far worse than Central America.  So I kept a large proportion of mud effect on the bases and dirtied boots, knees etc for the campaign look.  The bamboo bits are from the washing basket which after 30 years is starting to disintegrate.  At long last I have a use for it.  I am now in no hurry to replace the basket as it is now really proving it's worth!


I rather liked the head and hat and general pose of this figure (above and below).  He looks right. Under-fed, hair short/shaved, even if he does not have a Chindit style beard.  Some of these figures are very well sculpted.  I had reservations when I first saw them, probably the negative feeling from the broken rifle did not help, but they grew on me as I applied paint.


I probably will continue with building these up and adding Japanese to make a platoon with supports for each side.  I saw some magnificent AB Chindits in 20mm online yesterday that had me wishing for those, but there is no corresponding Japanese range, sadly.


I think these troops look like the hardened campaigners that they are meant to represent and I do quite like them.   As I painted them I kept thinking of what I have read about the troops who served in the hellish terrain, heat and climate of Burma and fought and finally defeated such a bitterly dangerous enemy. My respect for them has continued to grow.  

 More to follow in due course.  I have kept my A4 step by step painting guide of paints used  so I can pick up where I left off with no difficulty.   In the meantime I shall no doubt meander down some other historical path!


Friday 20 November 2020

Great War - 28mm British Mk IV Male Tank


In the words of Monty Python... 'And now for something completely different!'  After having spent most of the year painting 10mm redcoats, I was desperate for a drastic change.

Looking around my wargaming room I espied a bubble wrapped object on a piece of cardboard...and this is what I found, only it was just undercoated in black having been assembled at about this time last year and left covered to keep the dust off until my painting enthusiasm for large tank models came back.

The model is from North Star's Great War Miniatures range.  Unfortunately I can't see tanks shown on the list now, which is a shame as I would really like a Whippet tank to add to my collection.  I think only 1st Corps produce nice Whippets now.


I started applying the paint last Saturday and was unsure which shades to go for.  The best research material appeared to be online. It seems that RAL colours were unknown in 1917/18 (at least as far as modelling forum research has found) and there was a belief on the forums that shades could vary on mixes.


I found a source which showed one of the recently excavated tanks that had been buried by shell fire on the Western Front.  In the less exposed areas there was some green paint showing. Not khaki or brown as often depicted, but quite a strong green, dare I say it not too far off of bronze green. 

I did try a similar shade on the model and it seemed to over power it.  I changed the shade to make the effect of light more scale, and then with dust and weathering added this is the resulting colour I obtained.  All paints used were Vallejo.

The model was ok to put together. It was a resin model with metal parts. However, the beam tracking was an absolute pig to glue in place and only some bending succeeded in getting it to locate in place.  The chain on the beam was brought as cheap jewellery from Ebay as I thought it might look effective in keeping the beam in place.  Once I scrubbed off the 24 carat gold from the chain (joking), it painted up very nicely.


I used some of my mixed basing texture to apply to the vehicle as mud. This also disguised some of the bubbles in the resin so worked very well indeed.  I will apply some decals for number coding when I find a supplier who produces them.  I found some red and white markings online but opted to paint those on instead.


One of the Hotchkiss machine guns is formed from a bent paper clip and green stuff modelling putty and and some glue to form a foresight.  The machine guns are very vulnerable on the model so if the other one breaks I shall use the same method again.  It was good to use the dremel tool which I seem to use far less than I thought. It seemed a good investment at the time! 


 I was amazed to start applying the paint over the overcoat on the Saturday morning and finish it on the Sunday (while also painting 6 x 28mm German 1918 figures).  I seriously thought it was going to take weeks.  

This was a really nice fun project, totally different for me and just what I needed.  I think more tanks will follow. There will not be too many in 28mm though, the plan is to use them for a WW1 version of Chain of Command, so platoon sized actions with some supports.  I look forward to seeing it on the field.

Friday 13 November 2020

1746 - Battle of Culloden - Entire British Army - 10mm

It's been a little longer than anticipated since my last post.  With the lockdowns I thought that I would be spending much more time being able to write blog posts.   In reality I found that having to home work for two jobs from behind my desk, left me with little enthusiasm for spending any more time at a keyboard.  I am glad to say that the painting has been coming on leaps and bounds and I have done something that I have never yet been able to do.  I have finished an entire army.


Yes, a planned project went to plan and it's not taken 20 years to get close to a respectable level like most of my armies.  Nope, this one really took shape this year.  I finished the final touches at 3am yesterday. I was determined to complete it before going to bed.


The figures are all 10mm Pendraken figures.  I have shown a little bit of progress before in an earlier post but in the next photos we have all of the British Army.


Planning took the form of working out a ground scale using maps of the battlefield and deciding what figure scale would look the best.  I wanted the largest figures possible so that I could enjoy the painting and see the detail.  I knew that 6mm would have worked and with lots of space to space, but I have yet to enjoy painting 6mm figures.


10mm appeared to allow me to create units at an approximate 1 figure represents 10 men scale, so that a 300 man battalion would have 30 figures.  Some regiments had more, others had less but I stuck with 30 figures for an Infantry Battalion.


In 10mm I also had space for moving formations of troops and open areas on the flanks.  The decision was thus made and Pendraken's figures seemed to fit what I needed.  


I used the Osprey books extensively for the research and also used a book called 'Like Hungry Wolves' by Stuart Reid. This has a vast number of battle maps showing the evolution of the battle and provided a lot of background information.  The plates are also excellent reference material (painted by Gerry Embleton, so the standard is very high indeed).


I must also mention the website https://www.kronoskaf.com/ which is a superb reference source for the Seven Years War.  This being slightly later of course, but still providing much needed information which often gave me clues when I was stuck for source material.


I have tried to give an overview with the photos of the British positions at the start of the Battle of Culloden.  Some of my terrain is lacking so I have had to make do as best as I can to give some approximation of walls, hedges and buildings etc, but the positions are pretty accurate.


It was an absolute joy to get all of the units in their Divisional groups under their own commanders and see them all formed up.  The desire to see this - and check that my ground scale calculations were correct - have been a massive driving force to completing these.


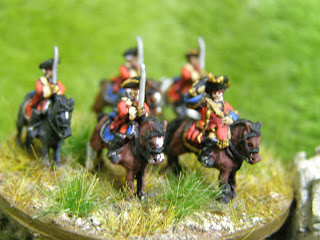
The cavalry posed an interesting conundrum for me.  Normally I don't worry about things like Squadrons and Troops and just have my cavalry organised in Regiments.  However, at Culloden it seemed pretty fundamental re-think this as the Squadrons were separated off, certainly for Cobham's Dragoons, so I needed to find a solution.


The solution was to use one stand and then form 2 Troops on that stand to form a Squadron.  So a standard Regiment was 3 Squadrons of 6 Troops in total.

Historically, the 10th (Kingston's) Horse in their blue Volunteer coats were understrength so were re-organised into 2 Squadrons of over sized Troops.  I have tried to reflect this by giving them more figures on a Squadron stand compared to the other Horse Regiments.


I also needed a way of differentiating between all of the officers.  Here we see Lt Gen Hawley the Commander in Chief above and the Duke of Cumberland as the Captain General of the Army below.

I decided that the number of staff officers (plus the main man) would indicate importance.

4 Staff Officers for the Duke of Cumberland
3 Staff Officers for Lt Gen Hawley
2 Staff Officers for Divisional Commanders
1 Staff Officer for Brigade/Reserve/Advance Guard Commanders


The artillery is also represented. I really like the officer aiming down the barrel (below).


It has been challenging getting the close ups.  Sometimes these images look ok until one tries to expand the photos!    The flags were from Pendraken sheets which I have painted over the top of to customise for each regiment.


10th (Cobham's) Dragoons above.  Plenty of detail here for the avid painter to enjoy.


Above and below here are the Duke of Kingston's 10th Horse (as opposed to the 10th Dragoons).  The uniform is conjectural but Stuart Reid has clearly carried out plentiful research and has changed his mind from the red coat in 'Like Hungry Wolves' to a blue coat in his later Osprey book 'Cumberland's Culloden Army 1745-46.' 


I do really like seeing a good red-coated infantry regiment formed up and ready for action.


Above we have a Coehorn mortar.  These were used at Culloden but not reported to have had great effect. Presumably the boggy ground absorbed the explosive effect of the shells.


Somewhat obsessively I do create under base and back of base labels for all of the figures.  I use a colour coding system on the back of base labels for small scale troops to ease keeping track of who is in which Brigade.


The 64th Highlander's above.  The bonnets appear very light in the flash of the camera.  I do tend to use lighter colours, the smaller the scale I use to try to show a more realistic reflection of light.


4th Barrells's Foot above.  The British Regiment that probably bore the hardest fight on the day


...and finishing off with the 21st North British Fusiliers.  

There were plenty of challenges with this project. There was a lot of research and decision making constantly.  Early on I needed to decide whether to go for the original 3 ranks or a more scale accurate 2 ranks (I went with 3 as it just felt right).  One tough decision was finding that I was 3 'hat men' short in a particular pose.  My option was to swap heads with some grenadiers and use Grenadiers but with hat heads instead, or buy another packet of 30 figures for 3 men!  I went with the head swap. It worked but that was fiddly in 10mm.

Of course...this isn't really the end.  Now I need their Jacobite opponents.  I had better buy some tartan paint!