It's not often that I do write ups of the games I play. I think its more to do with the fact that I don't really take photos all the way through the game to create a good narrative. I also forget what happened! It's also considerably easier and less time consuming to show painted figures instead.
However, I should really do more write ups, if only to remember the really great games that I played.
The battle that Ian and I played the other week was from the excellent series of scenario books produced by Caliver Books entitled 'English Civil War Gaming Scenarios'. This battle is from Volume 3 by Robert Giglio. The books are excellent in that the scenarios are transferable to any set of ECW rules and the information contained within is just excellent.
This battle looked interesting for several reasons. Not least because it was actually before Edgehill, and its not really that well known. The armies are a mix of troop types and it is not totally equal. One side is stronger in infantry but weaker in cavalry. Both sides are largely raw troops too...so care needs to be taken to avoid units breaking too soon.
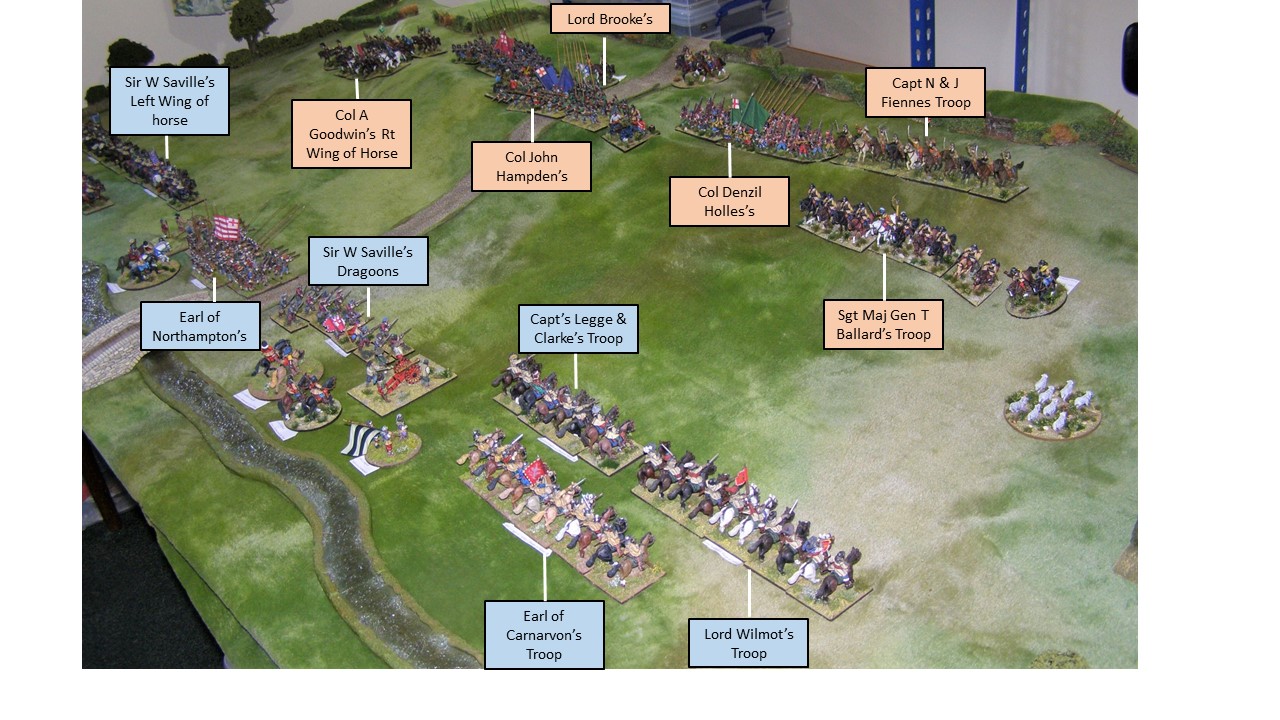
The above image shows the start dispositions. The horse units on the furthest end have been labelled as 'wings' for image space. The Royalists have the River Itchen and bridge to their rear. The road runs from Coventry, behind the Royalists towards Southam, behind the Parliament army.
Above we have the Royalist foote unit of the Earl of Northampton's Regiment (though it is actually painted up as a Cornish Regiment with possible flag colours - there can't be many ECW wargaming armies with correct flags throughout!). Stand-in units playing the part of the historical unit are going to be seen throughout this blog post..so ignore the flags! I think only my Northampton's Horse regiment has the correct flag.
A view from behind the Royalist right wing. These cavalry troops are from the Redoubt Enterprises range which still look good, but when they came out nearly 30 years ago, were just incredible.
Still behind the Royalist lines. The light gun and Saville's Dragoons get ready in the Royalist Centre.
View from behind the Royalist Left. The cavalry are a mix of Redoubt and Bicorne figures. This Royalist wing refused all orders to make it move throughout the entire game!)
The left half of the Parliament army arrayed above.
Another overview shot
A close up of fine Bicorne Miniatures cavalry
A rare sight, some of the English Civil War cavalry produced by Front Rank (closest to camera). I painted these in around 1991. They have been re-based several time but they have held up well to the decades. The Royalist cavalry have the better of the fight on their right and push break the Parliamentarians. Above, the reserve Parliament line attempts to make a charge to hold back the tide.

On the Parliament right, things should have gone much better. The Royalist cavalry they were facing consistently disobeyed the orders they receive to charge. As my Parliament cavalry wing receive the order to advance to take advantage, they 'blunder' their order and move off to their left oblique to stand in front of my infantry. This was not the 'infantry protection' movement that they were intended to make...someone blundered for sure!
A view of Northampton's Infantry from the point end. Figures are Bicorne with possibly some of the old Renegade troops mixed in.
With my left wing of horse routing and my right blundering, it was down to the infantry to save the day. my Parliament army was stronger in Infantry so I had to make use of it. I decided to advance down the hill and attack. Unfortunately the cavalry blunder blocked my infantry from moving, except for Col Denzil Holles's Regiment. A raw regiment but imbued with courage (or imbued with something!)
It was a bloody affair. The red marker shows they unit has become spent and the cotton wool smoke is disorder. The Royalist light gun and infantry fire poured a deadly fire into Holles's men. It was too much for them and alas they discarded their arms and broke and ran.
That was effectively the end of the battle. My narration makes it seem short but the game lasted a few hours and several game turns (we chat lots too!). It played like many of the smaller battles of the Civil War historically seemed to. Raw troops fighting with major collapses once things start going wrong.
With one broken cavalry wing and my Infantry brigade with most of its units spent, this meant that 2 of the 3 brigades were counted as beaten, so the last brigade had no choice but to turn tail and flee.
All in all it was a great game and made me wonder how 3 years could go by without playing one of my favourite periods (and probably with my biggest collection). The game played well and it was brilliant to read about and play another battle in a war that set the whole area around where I live between Oxford and Burford, ablaze with battles, sieges and skirmishes.
In the actual historical battle, it appears that Colonel John Hampden's Parliament regiment made a determined assault down the hill, with the light guns advancing and firing to support with grapeshot at close range, causing the Royalists to break and flee (offering to sell their weapons in the nearby townes 'for 12 pence a peece'). So in history it was a Parliamentarian victory.
I look forward to playing more Civil War games soon, though with the arrival of hot weather, my mind often wanders to the Western Deserts of WW2...
.JPG)
.JPG)
.JPG)

.JPG)
.JPG)
.JPG)

.JPG)


.JPG)

.JPG)
.JPG)


