Sunday, 3 January 2021

Great War - 1918 German Infantry Platoon - 28mm


Happy New Year everyone!  This was one of those units that was supposed to have been finished before Christmas, but crazy days, how does it all get so busy?  I don't think I picked up a paintbrush for a week!

This German Platoon is now nearly complete other than 2 x JNCO's/senior Privates to run two of the sections.  I also have some figures to paint to complete some support sections, such as the Granatenwerfer and an assault bombing section.
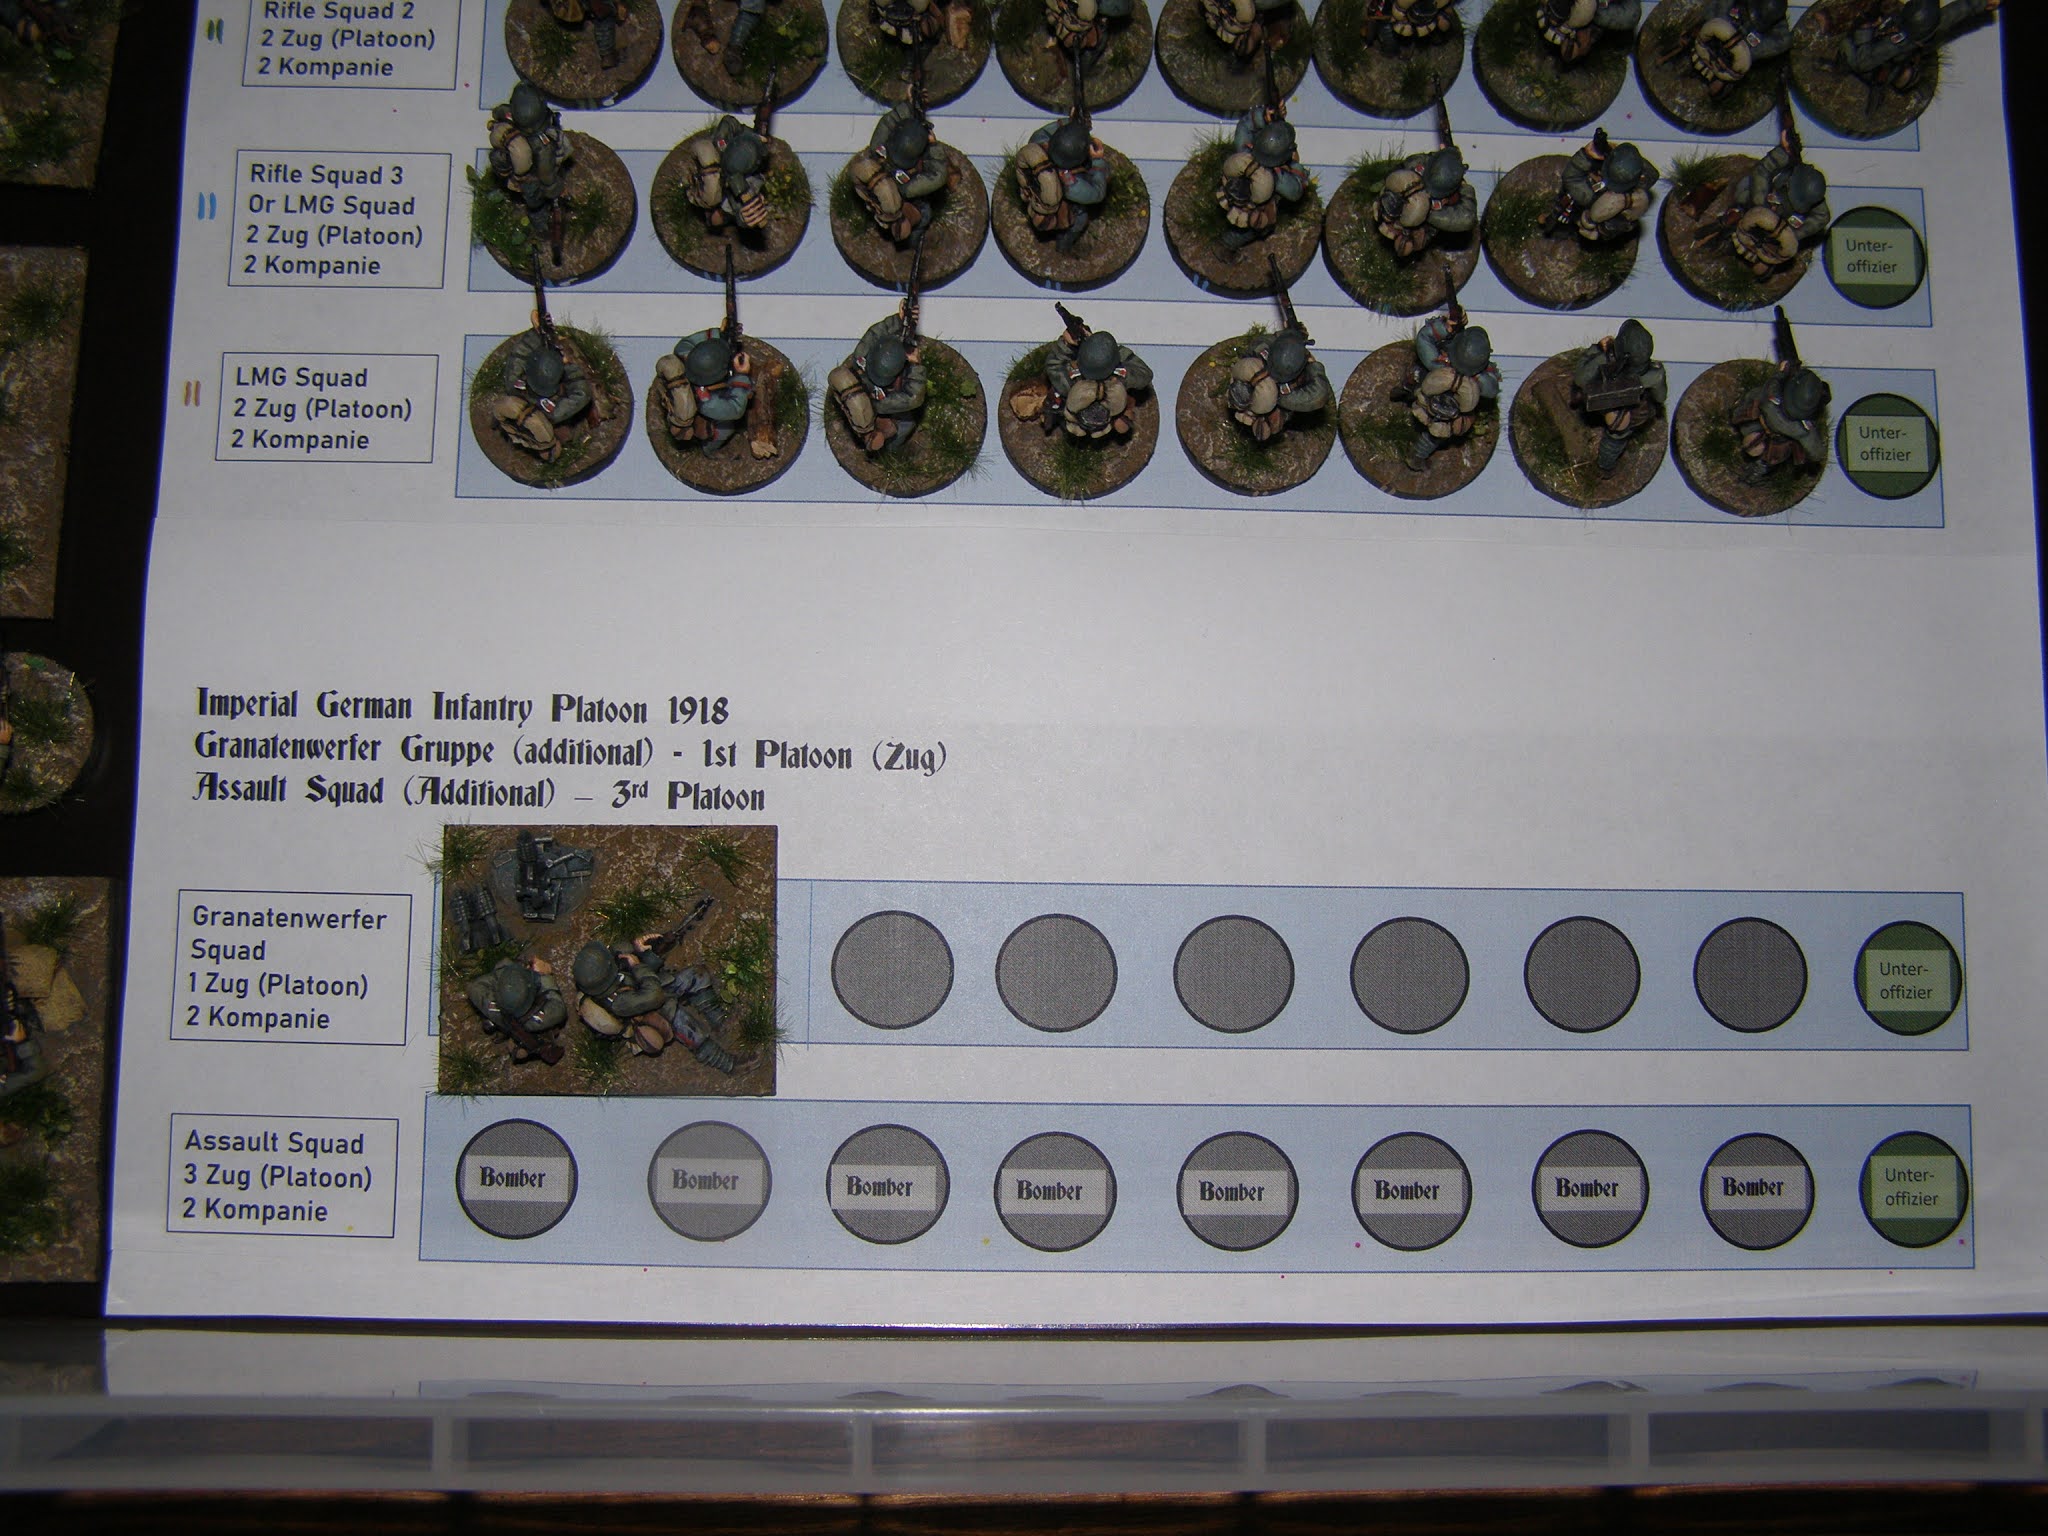
 

I  was greatly assisted by this idea which I saw on one of the blogs, but I cannot recall who it was (sorry!).  I have magnetic sheet on the floor of the box and also on the bases of the figures.  By printing an organisation sheet with relevant gaps in the Sections, I was able to focus much more clearly on what I was trying to achieve (and see which figures I had done).

The above picture focuses mostly on the supports and the picture below on the platoon of the 246th Reserve Regiment that I was re-creating.  (Blogger seems to post everything in reverse order now - took 3 attempts and still it was backwards!)


These machine gunners are left over but are bound to find a home in another Platoon.


I have used a colour coding method to match the coloured marks on the organisation sheet in the storage box, the two lines signifying 2nd Platoon.


Above and below is the LMG section comprising riflemen and an LMG team.


Rifle Sections above and below.


I have painted up 2 bombers for each Section.  Finding accurate information of how the 1918 German Platoons was formed appears hard to find. The Too Fat Lardies have produced supplements with some good information and this does seem to emphasise that by mid- 1918 there were no hard and fast rules anymore.  

Manpower shortages would no doubt have caused constant change.  It appears that were generally 4 sections in a Platoon but an extra bombing section and a Granatenwerfer section could also be added in some regiments and in other regiments the organisation might have been different again.  A complex topic which I won't go into too much detail with here.


The figures are again by Great War Miniatures and contain the earlier tunic as well as the later Bluse with hidden buttons under the front flap.  This allowed some playing with shades again, which adds interest and reflects the fabric supply shortages by late war.


I intend using the Chain of Command rules as re-written for WW1  in one of the Too Fat Lardies supplements.  The leaders take on a major importance so need to be visible when playing as their location on the battlefield is important.  I used a simple method of using a red brown for the bases of officers, a dark buff for SNCO's and a dragoon green for JNCO's. This was a lesson learned from playtests when I found that I was playing hunt the leader and spot the rank badges every turn.


The Great War Miniatures bombers just really look the part (above and below), I wasn't going to but I might paint up a Stossstrupp Assault Section at some point.


I felt slightly sorry for the figure below.  I was short of an SNCO so had to demote an officer.  As an officer he was slightly redundant and left over, but as a Vize-Feldwebel he will now be playing an important role in getting his men motivated and moving.  From my research it appears that the Vize-Feldwebel was one of those ranks which was senior enough to have officer accoutrements (such as belt, sword-knot etc) issued (rather like modern British Army Warrant Officers who often find themselves saluted due to wearing so many officer uniform distinctions).  It seems the Germans did similar.

Anyway, my new Vize-Feldwebel appears to be a man of action so will hopefully be pleased with his new role.


More officers above and below.


That might be all of my WW1 painting for the time being.  I have ordered a Whippet tank from 1st Corps, but I will probably paint something completely different in the meantime.  I have no idea what yet...and that's part of the fun of it all.

Monday, 14 December 2020

Great War - German Granatenwerfer 16 and Snipers - 28mm

This time we have some more German support elements for my Great War collection.  The Granatenwerfer 16 was a spigot mortar with a range of around 300 yards. It was a clever design which suited static trench warfare but could also be broken down into several large parts for rapid carriage for more mobile operations. A section would serve this weapon with the greater number of men acting as ammunition carriers.


The rest of the section is currently on the painting table but the main stand is here and has already seen action in a rules playtest.  I intend using the WW1 modification for 'Chain of Command' rules for these.


The figures are all by Great War Miniatures.  They are really well sculpted and I just enjoy painting them.  I might have mentioned that previously!


As the British have their Mark IV tank (shown in an earlier post), I have added a Mauser Tankgewehr M1918 to give them a further chance of knocking it out.  The rifle is precariously posed on a pile of bricks which I suspect would not stand the shock of firing without toppling over.  To give the illusion of it being a beefier support, I have added thicker foliage and broken tree stumps around the bricks.  The impression made by the bricks of it being in a fully urban setting is also dissipated which means it won't appear jarring when on a green field environment of the 1918 breakouts. 


Great War Miniatures also produce a sniper pack and these figures really deserved some time with the paint brush.  The additional armour on the figures is really interesting to see.  The figure is cast on a base with sandbags already in situ.  I just needed to build the ground up around his upper body and elbows to allow him to have sunk in a little.


The sniper figure below again comes on a base with some interesting cover already in place. Bricks, wood and corrugated tin adorn the base, giving the sniper some cover and plenty of  painting interest.  The armoured shield is a great addition and is based on examples in photos.


A kneeling sniper with additional helmet armour and also a standing sniper in face armour and home-camouflaged coat/zeltbahn make up the remainder of the pack.


I have had two solo-playtests of 'Chain of Command' for the Great War at the weekend, and these were a great success. I was slightly afraid of not liking the rules after so much effort gearing up towards it. But they are brilliant. Lots of tactical choices to be made every turn without getting bogged down in silly detail.  It does feel like a Platoon Commander's battle and that made it really interesting.  More next time!
 

Sunday, 6 December 2020

Great War - 3.7cm German Anti-Tank Gun and Flamethrower - 28mm Great War Miniatures

More progress has been made with my Great War collection in the last week.  Some models take on a life of their own very quickly and just fly along with painting.  That's what happened with these.  I found I couldn't wait to apply paint to them.

This 3.7cm Anti-Tank gun was needed as a counter for the Mark IV British tank that I added recently.  The gun was added in the last weeks of the war and fired a purpose made armour piercing round with exploding charge rather than being solid shot.  The low silhouette must have made it deadly.  It was capable of penetrating 15mm of armour at 500 metres.


Initially I painted the gun in field grey and I found sources showing random daubs of a brighter paint (possibly a dark yellow) applied in splodges.  However, on a model this can just look awful and I was also struck by the gun on the North Star website where the Great War Miniatures models are shown.  This pattern was used on their model just looked so interesting to replicate.

It's one of those really interesting things, that near the end of the war when there were so many desperate shortages of materials and no time to dally about, that the Germans spent so much effort applying complex paint patterns. A contrast somewhat to the WW2 Soviet method!.  It does make it interesting for the wargamer though.

The Germans have a few choices of weapons to take on the British tanks now.  This flamethrower team of the III Garde-Pionier-Battalion will be sure to make its presence noticed on the battlefield.


The black epaulettes with red lacing for the pioniers, Garde Litzen lace on the collars and flamethrower specialist badges on the sleeves identify the troop type.


I must admit to not getting bored with painting German WW1 troops.  There is a lot of potential to make little changes in leather and fabric colours.  So far the AK paints WW1 German Uniform shade is pretty spot on, though I find the highlight a touch too light so I apply a light wash of the main colour just to tone it down a fraction and also help to give a more woollen look.

With the chronic fabric shortages, re-issues of the older tunics was quite likely and much patching and repairing to keep uniforms going longer. So some of my 1918 troops (such as the Junior NCO with the gunners) has the older tunic of a greyer shade.

There will be more German to follow soon and then I might have enough troops - a platoon each side plus supports, to modify the Chain of Command rules for the Great War and give them a go.

Note mainly for self on photography: First pic used the 'M' setting and flash with daylight bulb above and in front.  Seemed to be much brighter and clearer than the usual settings. More experimentation seems to work as it might mean that buying a light box is unnecessary!
 

Friday, 27 November 2020

British Chindits WW2 - 28mm - Warlord Games

The random nature of my posts continues!  This time we have Chindits from the WW2 Burma campaign.

Since preparing my WW1 collection and getting it ready for playing with Chain of Command, I found myself also getting interested in the idea of a Far East campaign for WW2.  I must confess that one area of WW2 that I know least about is the Burma campaign, having focussed so much on Normandy and North Africa.   I feel I have neglected knowing the detail of battles in other theatres.

Having once spent 7 months in the jungles of Belize (though a pale shadow of the difficulties of Burma in the monsoons), I think I have always been put off by the thought of creating jungle terrain.  Though like so much else, if one puts ones mind to it there are ways and means of representing things without having to go to excessive lengths.

What really sparked this purchase was reading the memoirs written by the famous author of the 'Flashman' and McAuslan and many other excellent works.  George MacDonald Fraser's book 'Quartered Safe Out Here' is about his experiences as a rifleman in the Kings Own Border Regiment and is probably one of the best memoir books I have ever read.  This inspiration prompted me to want to learn more and so I found myself looking at wargaming figures.


I painted and finished these in about a week.  I found these to be very different to my usual fare of brightly coloured coats and lace and it was interesting to research the colours used and look at photos in books and online.

The figure below has an accidental tattoo on his forearm. A stray bristle had applied paint to his forearm and it actually made for a realistic tattoo, which I didn't spot until I enlarged this photo!  Such things being popular among servicemen even then, I shall probably keep the tattoo on him.  I might try to improve it further.

The Warlord Games Chindit Section comes in a box of 10 metal figures.  They were quite well cast with not too much flash. I was disappointed to find that one soldier's M1 carbine was without a barrel and then I heard it rattling in the box.  This took some gluing back!  It involved 'Greenstuff' modelling putty and then trying to disguise the new shape on the M1 fore-end...pics are further down.


I liked the variety of the kit carried, the poses and the demeanour of the troops.  It was good to see Kukris and machetes being carried and extra water bottles.  Some thought had clearly been put into to these.

Small niggles are that I think the SMLE's are slightly too short and that some heads seem to be a bit narrow (rather like some of the old Redoubt figures).  The Bren gunner appears afflicted like this. 

There was a near complete absence of slings on the figures. This, it could be argued, was because the men would have taken the slings off to move through the jungle.  However, personal experience of carrying small arms through jungle would lead me to believe that slings would stay on. Far easier to hack through jungle with a heavy blade if your rifle is slung. Most of the work is going to be arduous marching, dragging kit and fellow troops across unexpected rivers and up muddy slopes, or even pulling mules as in the Chindits case.  I rectified the sling situation with strips of paper with PVA white glue painted on to strengthen them, followed by painting in webbing colours.

The figure below appears to have his sling cast on and pulled short and tight over the magazine and under his hands, which I thought was ok, so I didn't add one on here.  Making slings was fiddly anyway!


Below we see one figure with an M1 Carbine. This is the one that arrived broken.  To attempt to disguise the bulge of modelling putty, I made a sling which had clearly looped itself over the fore-end. with this feasible excuse the eye seemed to forgive the awkwardness. It was certainly better than a missing barrel at any rate.

Once I had made the sling for this figure, I decided to do it for the rest of the section too.


One of my overwhelming memories of living and patrolling in jungle was the mud. Rotting vegetation and mud, and I imagine that Burma would have it far worse than Central America.  So I kept a large proportion of mud effect on the bases and dirtied boots, knees etc for the campaign look.  The bamboo bits are from the washing basket which after 30 years is starting to disintegrate.  At long last I have a use for it.  I am now in no hurry to replace the basket as it is now really proving it's worth!


I rather liked the head and hat and general pose of this figure (above and below).  He looks right. Under-fed, hair short/shaved, even if he does not have a Chindit style beard.  Some of these figures are very well sculpted.  I had reservations when I first saw them, probably the negative feeling from the broken rifle did not help, but they grew on me as I applied paint.


I probably will continue with building these up and adding Japanese to make a platoon with supports for each side.  I saw some magnificent AB Chindits in 20mm online yesterday that had me wishing for those, but there is no corresponding Japanese range, sadly.


I think these troops look like the hardened campaigners that they are meant to represent and I do quite like them.   As I painted them I kept thinking of what I have read about the troops who served in the hellish terrain, heat and climate of Burma and fought and finally defeated such a bitterly dangerous enemy. My respect for them has continued to grow.  

 More to follow in due course.  I have kept my A4 step by step painting guide of paints used  so I can pick up where I left off with no difficulty.   In the meantime I shall no doubt meander down some other historical path!


Friday, 20 November 2020

Great War - 28mm British Mk IV Male Tank


In the words of Monty Python... 'And now for something completely different!'  After having spent most of the year painting 10mm redcoats, I was desperate for a drastic change.

Looking around my wargaming room I espied a bubble wrapped object on a piece of cardboard...and this is what I found, only it was just undercoated in black having been assembled at about this time last year and left covered to keep the dust off until my painting enthusiasm for large tank models came back.

The model is from North Star's Great War Miniatures range.  Unfortunately I can't see tanks shown on the list now, which is a shame as I would really like a Whippet tank to add to my collection.  I think only 1st Corps produce nice Whippets now.


I started applying the paint last Saturday and was unsure which shades to go for.  The best research material appeared to be online. It seems that RAL colours were unknown in 1917/18 (at least as far as modelling forum research has found) and there was a belief on the forums that shades could vary on mixes.


I found a source which showed one of the recently excavated tanks that had been buried by shell fire on the Western Front.  In the less exposed areas there was some green paint showing. Not khaki or brown as often depicted, but quite a strong green, dare I say it not too far off of bronze green. 

I did try a similar shade on the model and it seemed to over power it.  I changed the shade to make the effect of light more scale, and then with dust and weathering added this is the resulting colour I obtained.  All paints used were Vallejo.

The model was ok to put together. It was a resin model with metal parts. However, the beam tracking was an absolute pig to glue in place and only some bending succeeded in getting it to locate in place.  The chain on the beam was brought as cheap jewellery from Ebay as I thought it might look effective in keeping the beam in place.  Once I scrubbed off the 24 carat gold from the chain (joking), it painted up very nicely.


I used some of my mixed basing texture to apply to the vehicle as mud. This also disguised some of the bubbles in the resin so worked very well indeed.  I will apply some decals for number coding when I find a supplier who produces them.  I found some red and white markings online but opted to paint those on instead.


One of the Hotchkiss machine guns is formed from a bent paper clip and green stuff modelling putty and and some glue to form a foresight.  The machine guns are very vulnerable on the model so if the other one breaks I shall use the same method again.  It was good to use the dremel tool which I seem to use far less than I thought. It seemed a good investment at the time! 


 I was amazed to start applying the paint over the overcoat on the Saturday morning and finish it on the Sunday (while also painting 6 x 28mm German 1918 figures).  I seriously thought it was going to take weeks.  

This was a really nice fun project, totally different for me and just what I needed.  I think more tanks will follow. There will not be too many in 28mm though, the plan is to use them for a WW1 version of Chain of Command, so platoon sized actions with some supports.  I look forward to seeing it on the field.