Showing posts with label Victrix. Show all posts

Friday, 31 December 2021

28mm - 1066 Norman Infantry - Victrix

A Happy New Year to you all!  I am just writing this in the last hours of 2021.  I know this is my 2nd post in less than a week after an absence of 6 months, but I wanted to do one more post to finish the year on.


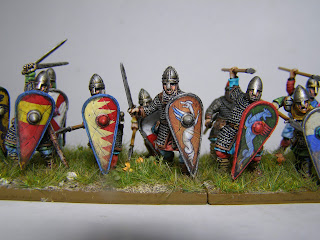
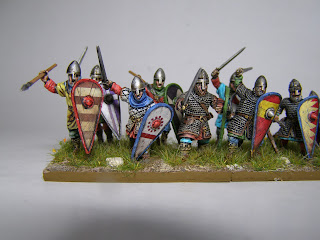
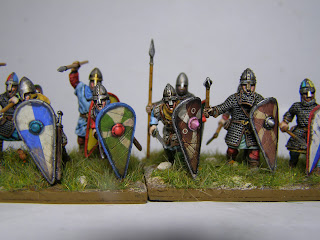
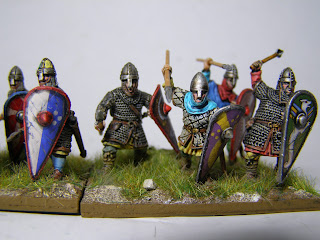
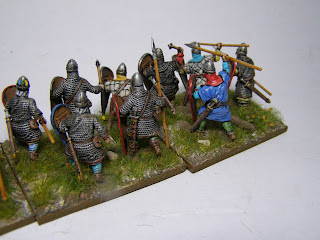
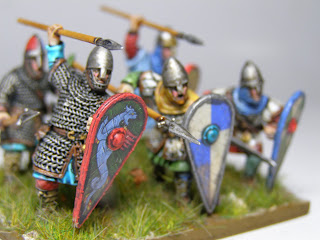
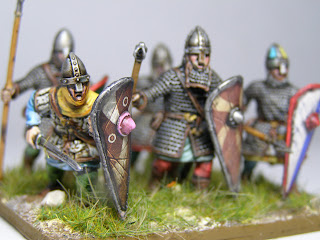
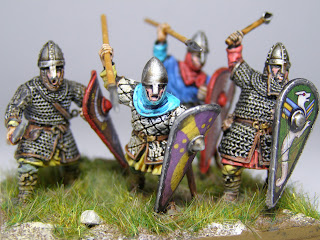
These are the plastic 28mm Norman infantry from Victrix.  I must say that I really enjoyed building and painting these. There are many options of heads and weapons and I don't think that I have two in this selection (it is only about a third of the pack shown here!)  that are completely identical.  


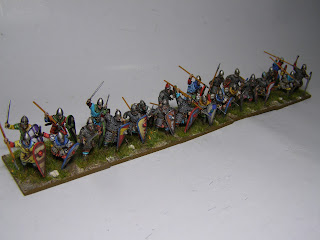
The figures are slightly taller than the Old Glory, Conquest Miniatures, and Gripping Beast that my Norman Army is so far comprised of.  If I keep the Victrix figures in their own units then I think it will not cause issues.


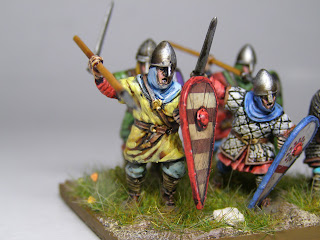
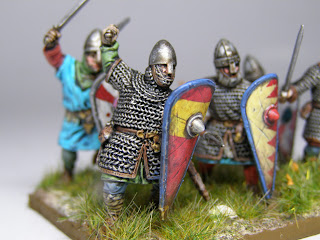
I have been continuing to experiment with new painting techniques.  Mainly this is to try to speed up the process.  There are just so many things that I want to paint and spending a month on a unit is just too long.  I have bought a set of Army Painter washes and used these to do the lowlighting.


My method now subdivides into 4 'blocks': 1 Basic Painting - starting with  a black undercoat and then a semi drybrush of white to show details and yet leave black in the deepest creases. I then use light shades for the clothing and skin (in Foundry paint terms this is the lightest 'C' shade). This light method is continued on everything, wooden weapons shafts, leather etc. Only the weapons are not done with a silver but a medium metal shade.


This is then followed by 2. The Wash Phase - I apply appropriate washes. By appropriate I mean green wash over greens etc and flesh wash over skin etc.  Where there is no wash to match the colour I tend to use Army Painter soft tone.  Armour and weapons gets 2 coats of Strong tone.


Next is 3. The Highlight Phase - I go back over with the light colours on tops of creases and put detail on, such as eyes, lips etc, lace work,  hair and beards etc.


Finally phase 4. The Final Bits - this is black lining in (this should be minimal as the shades should have done the work), highlight metal with silver etc, dry brush Vallejo Iraqi Sand to bring out leather, wood, and hair detail. I also use a black paint pen to draw around the inside edge of the shields to sharpen them and introduce shadow.  Matt varnish spray and then semi gloss on plate armour and gloss varnish on sword blades and spear points.


I will no doubt change this process as I keep on doing, painting is a process of constant evolution after all.  I probably won't use this method on Napoleonics and will stick to my ABC Foundry/Dallimore system.  For troops of a more rough and ready era, the washes seem to do the trick and to be honest, I don't think they look any different to troops that I have spent considerably longer painting.


There are more pictures to follow below, but there is little more to say on the painting methods.  I am enjoying the quicker results for sure.


Interestingly I found a sheet of paper today that I wrote in 2013 listing my projects and future projects and giving them the status of 'not started', in progress, and 'playable armies'.   There were many armies either not started or in progress.  I was delighted to see that I could now turn most of these armies into 'playable' as the troops have increased in number since then.  

Each time I play a game now, I seem to make a list of anything that seems to be in too short a number and then proceed to place an order.  It does seem that each game I play now costs me around £50 now in orders made straight after the game to fill in troop gaps! 

Anyway, it's all part of the fun.

I wish you a HAPPY 2022!!!!


Friday, 24 December 2021

Battle of Hastings 1066 and Happy Christmas


Well, I'm back! That was a longer absence than I expected!  I was determined to get at least one more post in before Christmas, mainly to thank you all for your kind comments on my posts during the year, but also to wish you all a very Happy Christmas.

I have been busy painting and playing some excellent games too.  Since July, blogging posts have taken a back seat as my second job became busy and also the shooting competition season started in earnest (after having been postponed for so long due to Covid).  Something had to give and it was the blog posts.

I have lots of freshly painted units to take photos of and post but this is all going to take time. This might well be where the holiday period comes in very handy.

The posts below are from a very recent Battle of Hastings game. Ian commanded the Normans and I took charge of the Anglo-Saxons: 


As per the historical battle, the Anglo Saxons awaited upon Senlac Hill for the advance of the Normans.  The rules used were 'Hail Caesar' which ,when tweaked for the period of history being played, we generally find to be excellent.  


A few skirmishers seen leaving the Anglo-Saxon position to hurl sling-shot at the approaching Normans.  Various extra rules have been put in place. For instance Huscarls form the front rank. As soon as a unit becomes worn, the rear Fyrd fill the front lines and their stats are used instead.  This represents the fatigue and disproportionate weight of combat wearing out the Huscarls.


The Normans advance solidly onwards.  The Normans are a mix of Conquest Games, Old Glory and Gripping Beast.  I have just added Victrix Normans to their army (these are slightly larger but look fantastic).


The infantry melee begins!  The red dragon banner of Wessex in the foreground with King Harold attached ready for combat.


The red pipe-cleaners denote 'worn' status. The Normans attacking uphill into the axes and spears of elite troops suffer but they achieve their goal of wearing down the Huscarls.


Casualty markers increase among the Anglo-Saxons (Aeronautica Imperialis flight bases - most useful for the Stamina and excess casualties stats - they do need to be made prettier though!)

The worn markers start to appear too as the Norman cavalry rip holes in the Anglo-Saxon line. I might need to reduce the size of the pipe cleaners - it's interesting to see the pics and realise how ugly too many markers can appear


With the cavalry beaten off the Norman infantry return. This time they force the ridge.


Great gaps appear in the line.  In the picture above we see a Norman unit in retreat towards the retreating Anglo-Saxons. The reason for this is that the Norman unit had managed to flank the Anglo-Saxon's and the latter had to turn a unit to fight them. Having won, the Norman's run in the wrong direction. Alas the Anglo-Saxons now have an enemy to their own rear.

A view from the Norman lines as the gaps are ripped in the Anglo-Saxon shield wall and units break.  Ian commands the Normans to a great victory.  There are many losses to the Normans but that  means more booty to share among among the victors!  Another fabulous game!


As usual after a game, I look at the troops where I have shortfalls, and how a collection can be improved. Inspired by the game I usually make an order within a day or two and get painting on the new units.  I ordered Victrix Norman Infantry after this game. They really are superb figures and I still have 2/3rds of the order to paint up!

Anyway, Have a great Christmas and superb 2021 if I don't get to post again before!

Tuesday, 6 April 2021

Peloponnesian War - Athenian Hoplites - 28mm Victrix


I have been busy painting Ancients since my last post. This time it is the turn of Phalanx's and Hoplites!  As usual I jump around with different time periods like a time traveller, paint brush in hand.


I have had small collection of Thebans, Spartans and Athenians in various states of incompleteness for several years.  I thought it was about time I emptied those boxes with figures still on sprues.  


The Athenians are especially colourful, the men being responsible for equipping themselves and bearing the cost.  With this freedom, the wealthier citizens no doubt took the opportunity to make themselves stand out from their fellows.


Just recently I became aware of how much unpainted lead and plastic I had stored away awaiting their time for painting.  I realised that I spend too much time painting and not enough time completing units.  I decided to try to speed things up with the Army Painter washes and just experiment..  I have used the 3 shade 'triad' method for a number of years over a black undercoat.  This time I opted instead to go for a white undercoat and do things differently.


I painted a fairly light shade of all of the basic colours and then applied the Army Painter washes over the top, taking care not to overpower colours that really needed lighter washes, or even dark washes of their own colour (such as the blues).  This proved very successful, and helped things to speed along.  What I found happened was that this method gave me a little more time to focus on colour choices and patterns on the linen armour and take some care with details.


I was unsure about the Foundry bronze colours that I used as they look quite light, and I wondered if the bronze should be of a deeper reddish hue.   It is possible that it was, but I read that great care and pride was taken in polishing armour to get it to shine.  With slaves on hand to clean and polish and short campaigns, I would have thought that a clean bright finish would be quite realistic.

 A wash with Army Painter 'Flesh Wash' over skin and bronze armour at the same time provided a nice reddish brown lowlight prior to highlighting.


Shield designs (thank goodness for decals!) are by Little Big Man Studios.  Mine were the best part of 10 years old and appeared to have adhered to the plastic sheet.  I found I had to pull the entire sheet off and then cut around the sticky transparent design.  Trying to peel off the cut out design simply was not going to happen.  I suffered sevearal losses with the decals.  I shall know now to try to use decals soon after purchase (ie. not leave it a decade!).


The troops have lots of character about them and a certain presence.  I really enjoyed painting them, though was glad to finish the box!  I split them into 3 groups to paint completely or it would have seemed hard work to do them all in one go.


The only criticism that I do have is the number of bareheaded figures.  They look nice for sure, but when some of the men are in full fighting order, it can look a little odd for other men to be taking their ease with their helmets off.  There is sadly no choice to use armoured heads instead.  You get what is in the box and the choice isn't there.  A bit of a contrast to the multitude of options usually found in a box of Perry Miniature figures.


The troops do have a look of momentum about them.


A few more photos to finish off.  I took quite a number of photos as I'm also doing a short photography course and wanted to try some settings on these figures and use these as examples of work on the course (combining my hobby with coursework!). 

The first photo on the blog of the Hoplite with Medusa shield and the photo below have both had some processing work to get rid of static grass left inadvertently on figures and also improving light and contrast of the image.


More Ancients to follow!