Saturday, 13 June 2015

Greek Peltasts

At last!  Some time to do a blog post.  I had been quite pleased to get three posts done in April, but May was less good for my blogging!  I have done some painting though and I am pleased to have got several units painted up over the last couple of months.


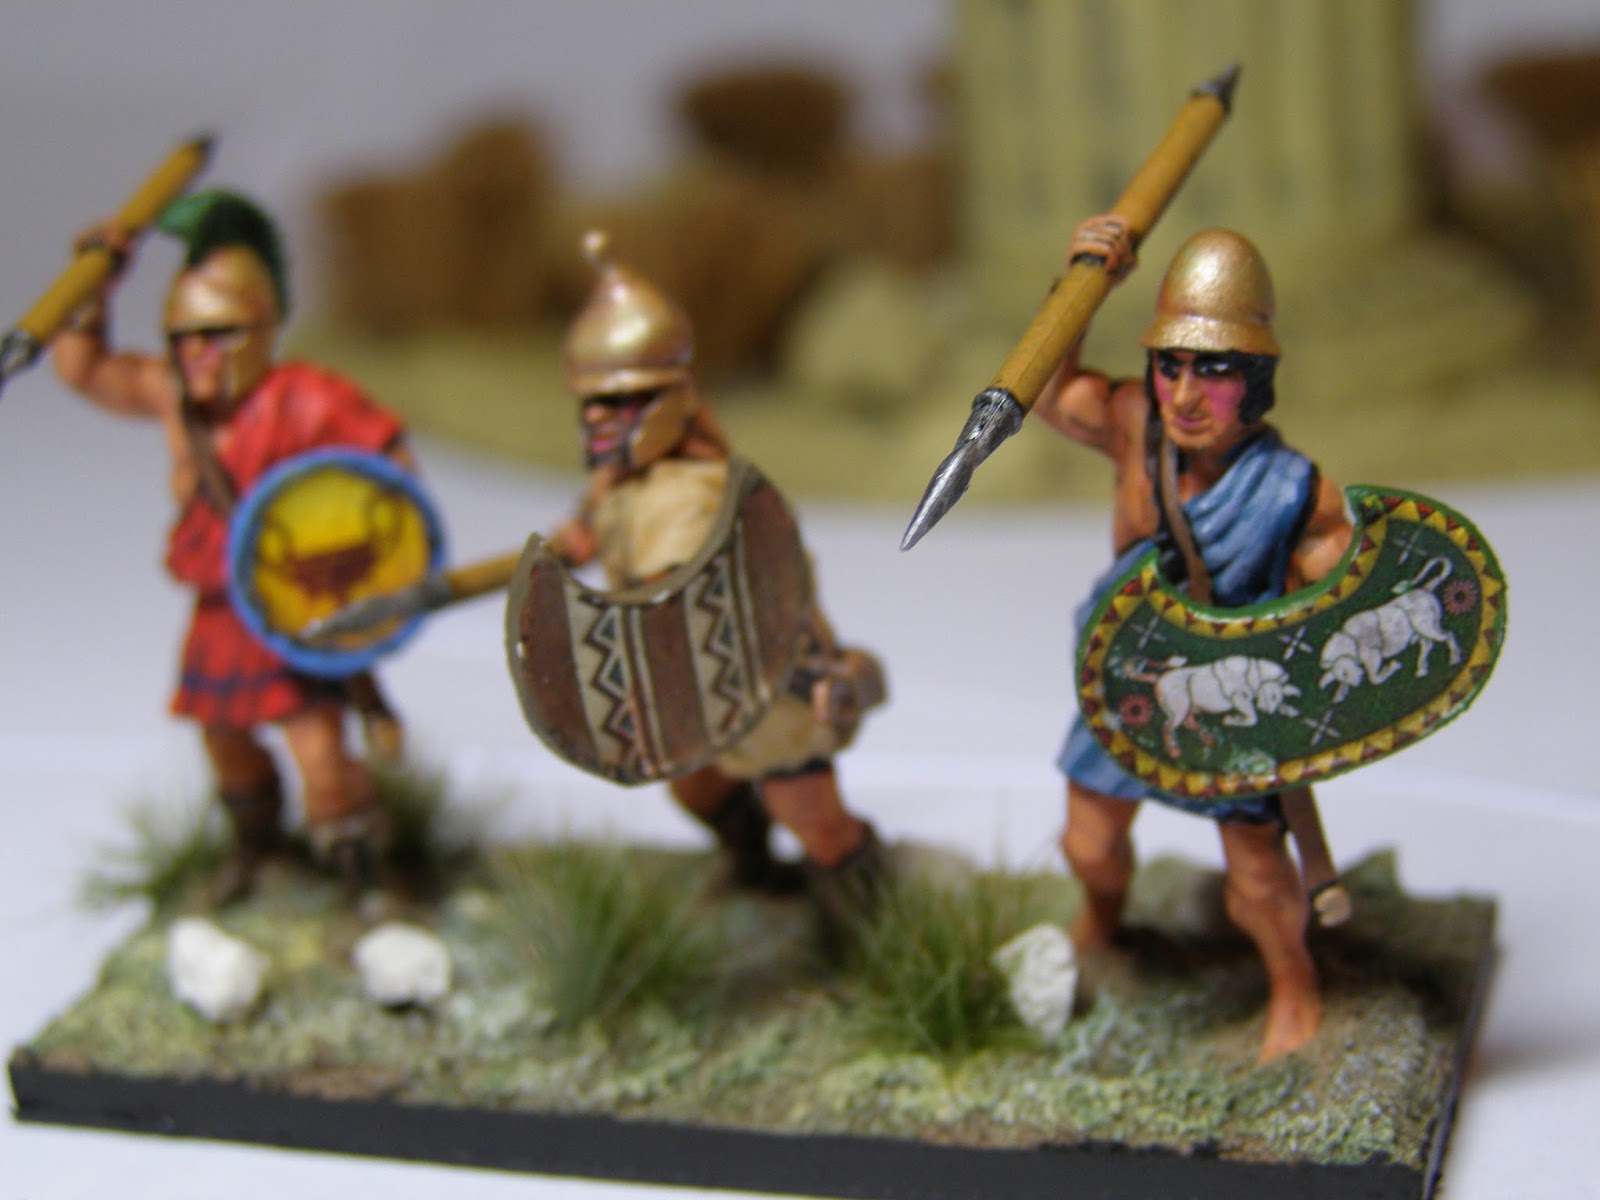
These are the 28mm Victrix Greek Peltasts from the excellent 'Greek Peltasts, Javelinmen and Slingers' box. They really are great figures and I thoroughly enjoyed building and painting them all. Paints used were mostly from the Foundry triad range and which I am finding very pleasing to use.


I must say that it was hard to decide who were going to be the Javelinmen and who were going to be the Peltasts in the box.  Basically for me it came down to a question of basing to ultimately differentiate.  Peltasts seemed to me to be infantry who could fight formed or in open order and were happy to skirmish at distance or at close contact.  


I decided to base my Pelasts in threes so I could disperse them in Open Order should the need arise.  I saved the arms carrying multiple javelins for my Javelinmen (who I will post a pic of at a later date) who will fight in more open skirmish order and are based in two's.  There seemed to be some blurring of roles and kit between the two types of troop from the sources I read, but I now have light infantry and skirmishers so this suits me fine.


The stand above shows my command group for this unit.  Just small details to differentiate this stand; a trumpeter and a suitably heroic leader with smart shield design, striped tunic and Corinthian style helmet to set them off.


They have seen action twice now, not against another Greek City State but in the Roman Civil Wars between Pompey and Caesar as Greek allies.  With some more painting I may yet get a Greek Army painted up...alas I'm currently in 17th Century mode with a strange pull towards painting Napoleonics...no idea what is causing this other than a certain anniversary!

Sunday, 19 April 2015

Roman Civil War - After Action Report


A slight change of period this time, but only a shift of a a hundred years or thereabouts.  Not Imperial Romans this time but Ian's collection of Caesarian Romans.  Ian has been working on these for a good few months and it was great to see the end result of all his hard work.

I laid out the desert cloth which I purchased the best part of 8 years ago (and had never used!) to provide a suitably arid landscape for the scenario for a clash between Caesar and Pompey using the Hail Caesar ruleset.


This was to be a small-scale meeting engagement between 2 x brigaded formations apiece.  Ian took on the role of Caesar and I took on the role of Pompey,  We utilised some of my Numidian warband, Greek Peltasts and Gallic Cavalry as allied contingents.

I managed to work out how to label up the maps with text boxes.  Units were organised and placed as above.


This view should correlate with the map.  The central area was quite open and I thought that having the wood to my right this would provide a suitable anchor point for my army to position itself.


We threw for commanders leadership ratings and Ian did well with a 9 for Caesar and an 8 for Mark Antony as subordinate commander,  I threw a 7 for Pompey (Magnus? Magma more like!) and an equally poor throw for his subordinate commander Labienus.  This was going to turn my order giving and movement into a real struggle!


Ian also won the dice to go first.  The first turn saw his legion moving one turn forward (due to being drilled as they actually failed their order), and his Numidians making a double move (please excuse the lack of spears in the Mumidian's hands - I hadn't got to arming them up before the game!)

Pompey failed his orders, but the drilled Legionaries moved forward one move as the rules permit.


Caesar and Antony failed to get their units to carry out orders in the following turn.  Pompey deployed slingers to the right of my line and into the woods to protect the right flank.


For the following turn, Ian's managed to get Caesar and Antony giving positive orders.  He extended his lines out on both flanks, directing the Numidian warband to face my slingers in the wood and his Gallic Cavalry to threaten my left flank at the opposite end of the board.  I adjusted my ranks and deployed into a more linear formation, with the aim of getting all of my units to have flank support.


The fourth turn was quite dramatic.  After all the initial manouvering and redressing of ranks, Ian launched a determined assault on either flank and got very high dice throws allowing the attacks to go hurtling in.


On my left the Gallic Cavalry hit my left-hand allied Peltast unit whilst at the same time the front was hit by legionary troops.  On my right the Numidians charged straight into my slingers.  The slingers attempted to evade but alas the Numidians achieved a triple move and wiped the slingers out as they caught up with them.


The Numidans broke out of the wood and behind Pompey's army.  How I wished I had enough for a reserve!

The melee on my left flank went even worse, The Peltasts were sent running away disordered by the double attack by Gallic cavalry and Legion, while my next unit of Labienus Legion was broken by one of Antony's Legions.


This suddenly meant that Labienus's Brigade was broken.  As he had attached himself to his Legion unit he was wounded and captured...perhaps Caesar would be merciful....?

It was clear at this point that Pompey was going to have to withdraw if he could.  Perhaps to Egypt...it's nice at this time of year too!

I have to say despite the dramatic ending after just four turns, this was a superb game which we both enjoyed.  I really am going to have to paint up some extra legionary troops to deploy with Ian's collection. Mainly because I could really do with a reserve for when it all goes wrong like this battle! I am painting some but in 10mm currently - clearly I need to be painting them in both scales.

All in all a great evening which even left time for a quick game of Star Wars X-Wing for the first time in over a year!


Wednesday, 8 April 2015

War of the Roses - Henry VII Mounted Men at Arms

It's been nice to have the time to complete a few small projects of late which I started but never quite added the finishing touches to.  This weekend it was the completion of a unit of Henry VII's mounted men-at-arms.


The figures are from the Perry's plastic boxed set.  I really enjoyed building and painting these troops. There are a lot of options within the box for varying degrees of horse armour, but I decided to go fairly minimal on the equine metal-wear.


I painted this unit primarily as I have a fascination with the battle of Stoke Field and I hope to have enough troops to try this out on the table soon.  They will also be mightily useful for Bosworth.  I am sure to use them in countless other games too but perhaps ignoring the livery and flag of Henry VII !


I'm particularly pleased with the way the standard bearer's horse turned out. I do like the contrast with the lilac shades too.

The flag and livery badges are by Citadel Six.  I have applied some shades over the flag to give an impression of folds and highlighting.  (Note to self: With a decal flag applied to a metal foil base it is important to remember not to bend it excessively or the paper decal will rip!) Some very carefully applied paint in the split paper seemed to correct this thankfully.  

I opted to use a square flag for the unit as I use the long swallow-tailed flags for command stands.  So for most battles Henry is likely to find himself with his cavalry so there will be a wonderfully medieval display of flags and heraldry wherever he gallops.

I really like the livery badges by Citadel Six but do find it essential to stick to their instructions - the use of a decal softener is an essential.


The Perry's armour sculpting is so crisp and just great to see assembled into a full harness.  When the dismounted Men-at-Arms were released I purchased a box of these very quickly, though I only assembled my first figures yesterday.  I look forward to getting these painted up shortly.


Paints used were a combination, but mostly Vallejo and games workshop.  The livery green is 'Coat d'arms - Grass Green' which I am running out of and hope I can still get - I must have had this bottle for years.


I'm going to have to get a unit of these for Richard III, it just has to be done!


Wednesday, 1 April 2015

Theban Hoplites

I have some time now to catch up with putting up photos of recently painted figures. These are the excellent 28mm Victrix Theban Hoplites from 5th - 3rd Century BC.


The paints used were mostly from the Foundry range as I am getting good results from their triad system of colours


Oddly, I hadn't really planned to get into painting Thebans. My original intention was to paint Athenians and Spartans, but once I saw the box of these troops at a wargaming show, I knew I just had to get some. The Boeotian helmet really adds a lot of character to the Thebans.


Of course now I have them painted up, inspiration has struck and I want to build up an army of these. From what I have read so far, they changed sides from being an ally of Sparta to being the enemy who finally destroyed them.


The figures were a great pleasure to paint and I am really looking forward to getting the time to paint up some more units to support them.  As usual though, I have too many projects!  No doubt when the spring turns into summer and the heat starts cracking the roads again (or close enough to it for the UK!), I shall turn my attention again to Ancient Greece.


PS. Apologies to those whose blogs I normally follow and comment on - I have been away for over two weeks and have to catch up with lots of reading!

Tuesday, 10 March 2015

After Action Report - A Romans and Britons Encounter Battle


The figures came out again for another ancients battle at the weekend.  Unusually we have stuck with the same period of history for a 5th month in a row!  Both Ian, my regular opponent, and I are reading the same historical books at the same time.  The Penguin classics of 'The Gallic Wars' and 'The Civil Wars' have proved very inspirational.  The Caesarian Armies are still coming along and nearing completion so the Imperial Romans came out again - and that's no bad thing either!

We decided to go for an encounter battle.  The objective being the destruction of the opposing enemy army.  The key features of the battlefield gravitated towards the centre which encouraged swift movement (always helpful when time is limited!).


I'm using a mapping software programme for this map - I'm pleased to have discovered how to save it to my pictures file (note to self - select 'export' to blog pictures file and save as JPEG!). However, I cannot fathom out how to label the map yet with this software so I shall save that treat for another time.

The large green blob is the key feature - a large hill.  There is a road running from East to North bypassing the hill and between two areas of marshland.  Woods are dotted about.

It will suffice to say that the British Tribes are situated to the West (Blue) and the Romans are to the East (Red).  Infantry Divisional symbols are shown but the armies broke down into 3 x brigades each side (forming the division).  Cavalry, Chariots and Scorpions also added to the discomfort of the foot-sloggers.

Ian and I both diced for command ratings.  Ian's Roman General was an excellent 9 with both Brigade Commanders a sound 8.

My Britons suffered some bad dice luck with command ratings.  My general was 7, with one Brigade commander a 7 and fortunately my cavalry/chariot brigade commander an 8 (phew!).

We diced to see who went first and the Romans won 6-1.  My dice seemed to have been cursed by the Roman priests!


This photo can hopefully be orientated to the map.  Note the hill, road and marshes to the North.  My Britons have deployed to the west.


We used Hail Caesar rules for this game.  I have plans to use 'To the Strongest' for my current painting project (10mm Caesarians) (one Legion nearly painted already- hurrah!)

Anyway, I digress...

Game Turn One saw the Romans make a general advance.  The Britons started to suffer straight away from their poor command ratings and my orders didn't reach any of my troops - so no movement for me!

Game Turn Two saw the Romans advancing all across the board.  This was looking bad for me already! I managed to deploy my chariots and cavalry on my right wing.  I saw Ian deploying his cavalry down the road at the North of the board but I didn't want to be distracted by them.  My mobile brigade deployed at the southern end and aimed for the Roman Auxiliary Brigade.  I needed to hit his lighter units before his Legionaries deploying in the centre did the real damage.


Game Turn Three saw the Romans drawing ever closer and I was only just getting on to the board with my tribal infantry. You can see Ian's cavalry taking a wide sweep to the North on the road.  I really want to take that hill and not be diverted by cavalry from my objective.  Ian was deploying skirmishing archers and Scorpions onto the hill on this game turn.  Even the Legion had secured the southern end of the hill - a worrying development.  My tribesmen had ignored their orders for too long and it looked like I was going to get boxed in.

British Cavalry and Chariots about to make a triple move charge against the Auxiliaries 


Drawing in towards my centre. A solid mass of Legionaries 


 My British tribesmen.  Looking scary but refusing orders to advance!


 A view from the north of the Roman Cavalry heading at speed along the road in column

A view from behind the Roman lines - note one of the British tribes angled against the threat of the cavalry.  Please ignore the undercoated in black Roman General.  We needed another commander and this one is still not finished!


At least something's moving for the Britons!  A triple move charge crashes into the Auxiliaries 

The British cavalry push back the opposing Auxiliary unit and follows-up!  First melee success to the Britons!  After the initial inactivity from poor command rolls this was an unexpected success!

Game Turn Four saw the Romans mostly static put putting pila and scorpion bolts down range.  The British cavalry force beat back the Roman Auxiliaries again, who go off the table and are thus broken as a unit.  Things are looking up!

Game Turn Five and Six, however, changes things!

The Legion are content to halt and block my tribesmen in. The reason for this holding action becomes clear soon enough! 


 The Auxiliary cavalry gain a triple move and form into battle line and charge my flank. I have little choice but divert troops from my centre to shore up this flank or my tribesmen will be surrounded


Game Turn Six sees the Roman Legion spot the crucial moment of the battle.  Both of the Britons flanks are under pressure and the centre has to be weakened to fight on the flanks.  The Legion charge! 


This is where things went wrong on the British right (the south on the map).  The chariots were beaten off in melee and this was followed by the cavalry being made to retreat disorganised (ubiquitous cotton wool) as they were charged in their rear and unable to turn to meet the threat.  The retreat move could not be completed because their was a battery of scorpions I had been hoping to charge to kill easily.  Alas as the retreat was blocked by them, my unit disintegrated. So the fortunes of war changed so rapidly.


The victorious Roman cavalry prepare to charge another unit 

 Another view of the action in the centre


 I couldn't get the tribesmen to charge up the hill due to poor dice rolls and disorganising fire.  The Romans did a great job of pinning the troops down while I had to pull back supporting units to prepare to receive cavalry from the flank 


Two tribes take on three legionary cohorts - the end is nigh!

At this point I conceded the game.  Both flanks had caved in and the Legion had bided their time, squeezing in the centre until they finally added their weight. As I weakened my centre to push out to protect the flanks the charge was always going to succeed.  I could see the situation developing but there was little I could do to change anything.  The end was inevitable.  Ian had fought a textbook action and the victory for his Roman's was total!

All in all a very enjoyable game.  This was especially pleasing as the previous two games had thrown up quirks.  I haven't written those games up but the improvements have been implemented into my copy of the rules.  

One of those games did involve a river crossing where neither of us could get our troops to find the fords in the river by pulling out a sequence of just two playing cards (one beating the other).  In the end our troops just stood on their respective banks and hurled stuff at each other as they just could not cross.  Amusing but not the best outcome for an ancients game.  This was just really really unlucky and not a reflection on the rules.

The other odd game threw up a rules quirk.  When shooting at an enemy in Hail Caesar, 6's on a D6's cause a throw to be taken on a Break Test chart.  This threw up an extreme case where a fresh fanatic warband was stopped in its tracks by a tiny skirmish unit of archers who made them retreat (without inflicting a single casualty!).  This seemed to both of us to be very unsatisfactory and I searched on the internet to see if anyone else had modified the rule on this.  I was very happy indeed to find this:

http://blenheimtoberlin.blogspot.co.uk/2015/01/black-powder-modified-hail-caesar-break.html

Bill's solution is absolutely perfect! I use this table now instead.  Disorder is caused by 6's on D6s (like Black Powder) but break tests are now only thrown if the hit unit is already wobbly with shaken morale when it is shot up. What a great solution and it played really well too! The only difference to this sheet we have made is that we do count the difference in casualties between the two sides in melee as deductions from the break test throw of 2D6.

This will be the last game until April and I will still be happy to get the Roman's out again next time as they always look great on the table. Maybe the Caesarians will be ready...!