Saturday 28 December 2013

Edward IV's Bowmen - Wars of the Roses


Having enjoyed painting the Duke of Exeter's bowmen recently (see last blog post), my enthusiasm carried me on to paint another box of Perry's Wars of the Roses bowmen.  This time I painted Edward IV's men. For too long now my Edward contingent has been formed of his men-at arms, but backed up with Levy Militia billmen and ad-hoc crossbowmen and handgunners to give him the firepower.  Not any more though! These bowmen are a very welcome addition and further improve my Wars of the Roses collection.


Even though I had just completed a box of the Perry Bowmen, I still found it an immense joy to assemble, prepare and put the colours on them.  I still marvel at the detail of the casting and the characters one creates as they are assembled.  I could carry on with saying how good I think the Perry sculpts are, but I imagine you know that all ready!


The command group was enhanced by the banner set from Citadel Six.  I have become a big fan of their wonderful flags and banners.  The banners are transfers/decals which adhere to a metal sheet, which is carefully wrapped around the flag pole.  Flag poles are provided in their sets, but I decided to use the existing Perry's pole (largely because I had already painted it up!).  The flag went on with no trouble at all and I really like how it looks.


I used my rather labour intensive painting methods as used to paint the Duke of Exeter's bowmen.  It means it takes me a month of evenings (and some weekend days) to complete a 30 man unit but I like to get the figures looking as good as I can.  One can always go further with detail of course - but there is a point where you just have to stop if you want to finish them and see them on the table!


The paints used are mostly Vallejo and Citadel and Miniature Paints.  Basing flora is again by Mini Natur.


The livery badges on the fronts and rear of the livery coats are again by Citadel Six.  I'm getting much more confident in using these.  Despite their small size, they are easy to use if their detailed instructions are followed, a really sharp blade is used to cut them and decal softener is applied. I'm now happy to slice them apart to use where just a hint of badge shows, whereas a little while ago I would have tried to paint them on instead.


So what to paint next?  Well these were so much fun that yesterday I spent the entire day assembling and preparing the Perry's mounted Men-at-Arms set.  Today was the undercoating phase.  I would like to continue a bit longer with my Wars of the Roses collection before getting side-tracked into something else.

The inspiration comes each month when I drive up past the location of the Battle of Stoke Field.  I would like to have sufficient Irish and Mercenaries to form Lovell and Lincoln's forces, but so far only Old Glory appear to make the Irish and I have yet to examine those figures (O.G. can be very hit or miss!).

I'm also desperate to get into 'Chain of Command' and Spearhead (both WW2 and Modern).  2013 was supposed to see me make more progress with my AWI collection - this might have to wait a little longer. Being given the 'X-Wing' Star Wars game for Christmas is a wonderful distraction too, but thankfully the models being pre-painted it shouldn't impact on my major projects too much.

Here's to a great 2014!

Best wishes,

Jason

Saturday 30 November 2013

Duke of Exeter's Bowmen - Wars of the Roses


Following an intense period of re-basing and 'refreshing' some tired looking units of various periods, I decided to paint a new unit at long last.  These are the Lancastrian Duke of Exeter's Bowmen for the Wars of the Roses.


The figures are by Perry Miniatures and I have to say what a complete joy it was to assemble them. Some plastic figure sets are annoying to assemble, awkward and bloody hard work.  Not these.  I can honestly say that I really enjoyed assembling them.  It was quite a simple task to see what arms went well with which torsos and the whole project was made so much easier by the weapons already being cast into hands.  This makes for a nice easy project.  I used Humbrol Polystyrene Cement and this worked perfectly.


The Perry's sculpting is just amazing.  Some figures stand the test of time and will always look good.  By this I mean that some figures, like for instance, the Airfix 1/32 scale 8th Army set (which must have been sculpted 40 years ago) will remain timeless because the figures just looked anatomically spot on and are so evocative of the images we have of 8th Army soldiers.  Likewise some figures look awful from the time they are produced and twenty years on you are left wondering why on earth you bought them.  I think in 20 years time I will look at these and will still think what wonderful beautifully proportioned sculptings they are.  I wouldn't be at all surprised if in 30 years time these are still being produced.


The troops have been painted with various acrylics including, Vallejo, Miniature Paints and Citadel.  I used a base colour, darker wash, highlight, then line in method.  Long winded but I like the results.  I have an A4 folder where I keep a sheet per troop type of step-by-step procedures used for painting a unit.  There are about 25 individual steps for these troops and that's before I get to the basing(!)  I do wonder sometimes whether I should just try a dip method one day!


The bases are MDF by 'Products for Wargamers' and the flora is by MiniNatur.  I have moved away from static grass and use various lengths and types of grasses over a textured and painted base.  There are currently 20 steps in my procedure list of basing too now!


I have used livery badge decals on the coats of the bowmen.  These are the decals made by Citadel Six.  If there is one tip I can give anyone to using these transfers it would be 'use decal softener'.  Without it, applying them is very hard, and with it everything changed and it became an almost easy task.  The instructions they include with their decals are very comprehensive and are based on excellent advice.  I really like the Citadel Six decals and I will be using them a lot more as I push through 'tarting up' my collection. The Livery flag is made by Freezywater Flags, which I have done a little bit of brushwork on to give it more detail.


And here we have the box.  I have always had a weakness for really good box artwork and this takes me back again to those Airfix and Esci boxes (does anyone else remember the Esci Waterloo boxed set? - I must have spent hours just looking at that Scollins artwork).  I digress slightly there, but the Perry's have chosen well to have this magnificent Peter Dennis scene on the front of the box.  The shocking thing for me is that I must have had these sat on a shelf in my wargaming room for 3 years before I started work on them - a hidden gem, all still attached to their sprues!

As you can probably tell, I really like these figures.  Will I be getting any more? Oh yes - and I have already started painting them!  I have now also ordered the Perry's mounted men-at-arms set which I just can't wait to see having now painted the Perry's armoured commanders for the bowmen.

Wednesday 20 November 2013

Wars of the Roses - After Action Report


Having spent too long re-basing my Wars of the Roses armies, it has been good to get a game in again.  As you will see from the pics, some units are not quite finished as far as re-basing goes, but I think I started to lose interest after the 400th figure or thereabouts!

The battle was loosely based upon one of the 'Scenarios for Wargamers' layouts by Charles S Grant.  I based the action on the holding action scenario again (as used a few posts ago for a French-Indian Wars game).  I modified the forces somewhat from that in the book and made numerous changes to suit my forces.

The purpose of the game was to test out a few more ideas for a modified 'Hail Caesar' battle.  I made more tweaks to try to get more of medieval feel to the game.  It was also good just to see how the newly re-based troops looked on the table at last.

Ian was to take the side of the defending Lancastrians.  I was to lead the attacking Yorkists.  I read the following brief to set the scene prior to deployment;

'It is 1461, Edward, recently crowned, is marching north to York to take his family's city and to depose Henry VI who the Lancastrian forces rescued at the Battle of Wakefield.  On the way north, Edward has heard that the Lancastrians are assembling their forces to stop him.  Edward's scouts report that the Earls Oxford and Northumberland are holding a strategic crossing south of York.  They are awaiting the arrival of the Duke of Exeter with his contingent.  Edward has rapidly set off, stealing a march to knock Oxford and Northumberland aside and to take the river crossing point before Exeter arrives.'

Forces
Yorkists:
Edward IV (Army Commander), combination of handgunners, billmen/men-at-arms(on foot) and mounted men-at-arms.
Earl of Warwick, combination of bowmen and billmen/men-at-arms (on foot)
Lord Fauconberg, combination of bowmen and billmen/men-at-arms (on foot)

Lancastrian
Earl of Oxford (Army Commander), combination of crossbowmen, billmen/men-at-arms (on foot) and one medium artillery piece
Earl of Northumberland, combination of bowmen, handgunners, billmen/men-at-arms (foot) and one Organ (volley) artillery piece
Duke of Exeter, combination of crossbowmen, men-at-arms (foot) and mercenary pikemen

Objectives
Edward needs to take the bridge (both ends) by Game Turn 12 (Nightfall). Should both ends be taken then this will result in Yorkist victory.  Oxford needs to prevent Edward from taking the bridge by Game Turn 12.

Reinforcements
The Duke of Exeter will attempt to arrive from the North to reinforce the Lancastrians.  From Game Turn 4, a D6 will be thrown.  On GT4 a one is required, on GT5 a one or a two is required and the chances escalating by one each turn until Exeter arrives on GT10 (if the bridge has not been taken already).  There are no Yorkist reinforcements.

Deployments
Lancastrians will deploy Oxford and Northampton on high ground either side of the road leading to the bridge.  Exeter will start off board until reinforcement dice thrown successfully.  Yorkists will dice for deployment at either of two points.

View from Lancastrians end. Yorkists yet to deploy down road

Special Rules: These will be explained further on.

To Battle
Game Turn 1
 Warwick and Fauconberg enter on different points of the board and march in column towards the Lancastrians.  The Lancastrians await developments.

Northumberland awaits on high ground

Oxford on the opposite high ground also waiting. 

Game Turn 2
Fauconberg makes a triple move which leads his extended column out in front of Northumberland. This is a hazardous, if not reckless, move.  Warwick makes a single move from his very distant entry point on the board.  The Lancastrians open fire with handgunners, organ gun and the medium gun....which promptly explodes killing the crew!

Fauconberg deploys close to the Lancastrians, inviting fire

Catastrophe! The gun explodes on it's first fire!

Game Turn 3
The Yorkist columns advance and attempts to shake out the units into some kind of order.  Lancastrian fire hits and wears down Fauconberg's exposed bowmen.

Handgunners pour fire into the bowmen

Game Turn 4
Poor dice throws leave the Yorkists moving slowly.  Lancastrian dice luck is also poor. The first reinforcement test fails and then the organ gun misfires!

Crossbowmen prepare their bolts to fire on the advancing Yorkists

Game Turn 5
Poor dice seems to be the order of the day...Fauconberg blunders with his orders for the bowmen and they fall back one turn.  Lancastrians continue putting skirmish fire down and fail to bring on reinforcements

The very slow march of Warwick

Game Turn 6
Arghh! Those dice! Edward's mounted men-at-arms which had looked so threatening before suddenly blunder their orders, fleeing and losing 1/6th of their strength points in the process.  Lancastrians are amazed and continue to launch arrows into the confused Yorkists.  No reinforcements yet.

The battle lines draw closer
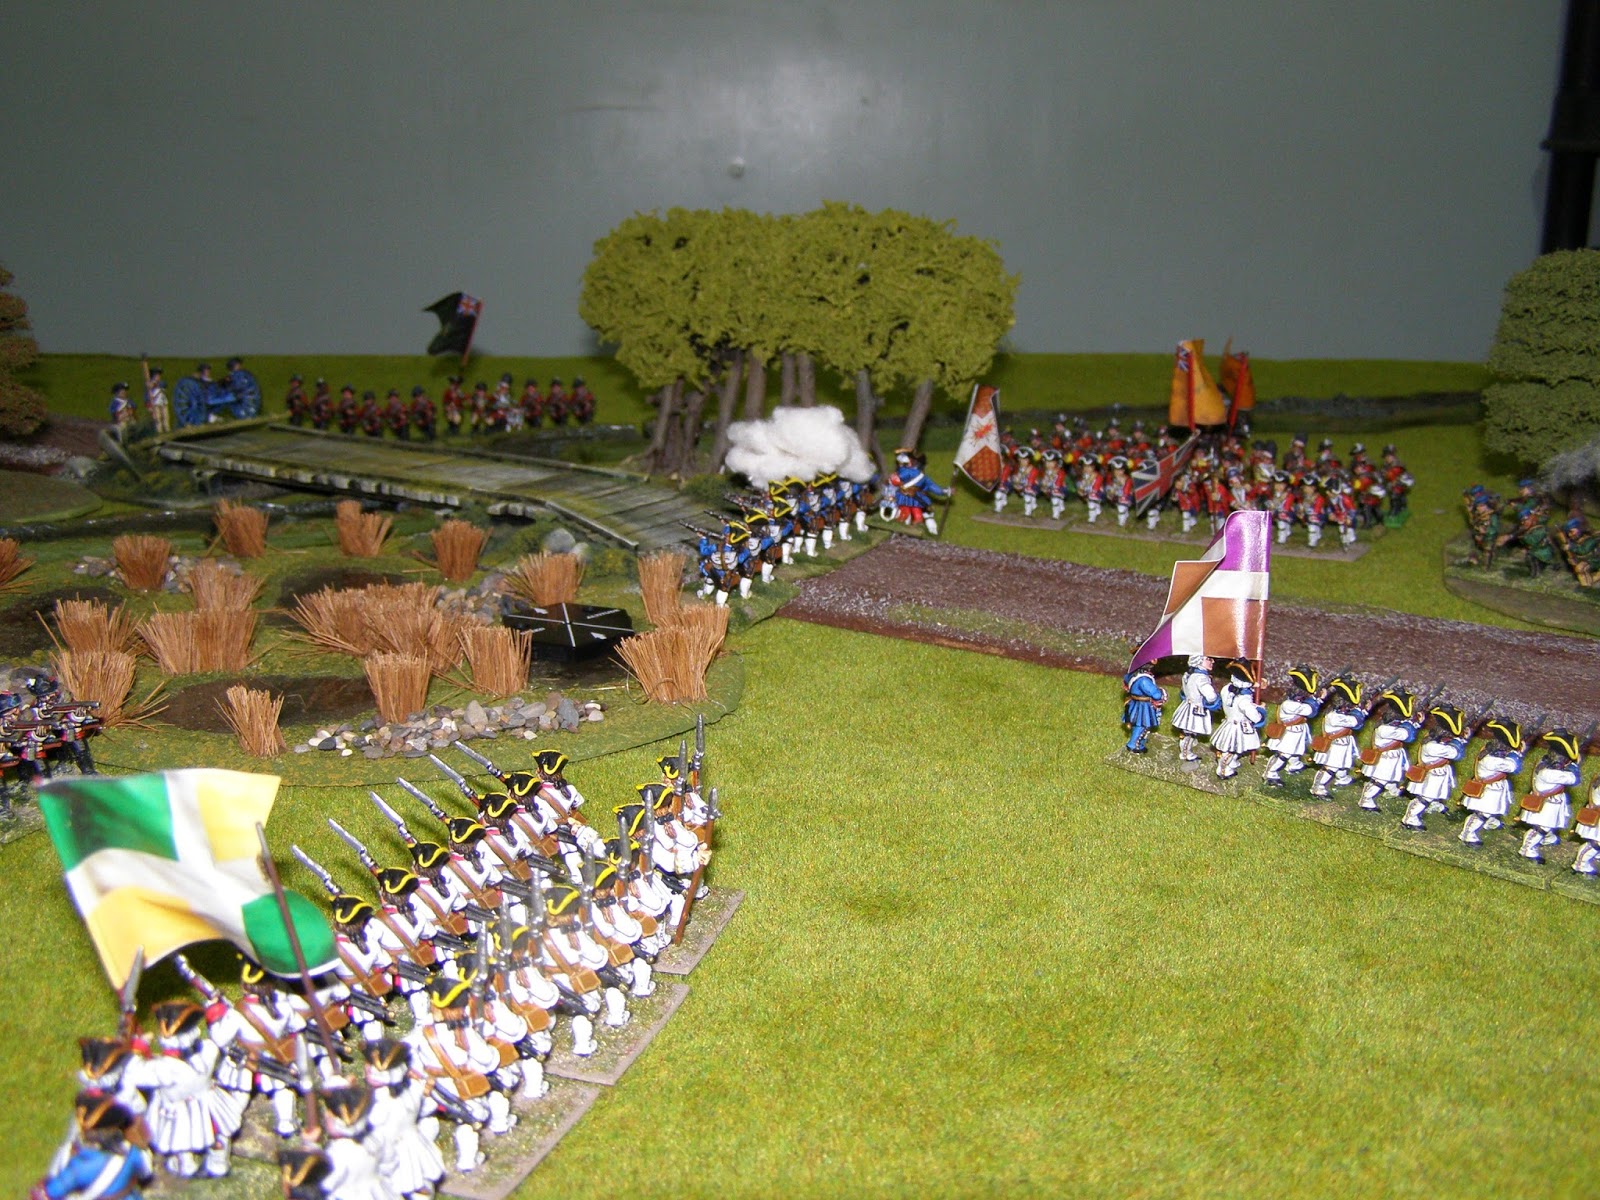
Game Turn 7
Yorkist handgunners tire of their ineffective skirmishing and charge the Lancastrian handgunners. The melee is drawn.  Lancastrians successfully reinforce - Exeter arrives on the bridge.  It's all looking really bad for the Yorkists now.

Exeter arrives to secure the bridge

Game Turn 8
Yorkist handgunners lose the melee.  The whole battle is looking disastrous at this point.  Suddenly the Lancastrians pull out a treachery card and discover that Exeter is not as loyal as they thought!  Exeter takes up a position on the bridge but refuses to advance any further to assist in the battle.  He seems to have deliberately misinterpreted his orders and has secured the bridge but no more...is he in the pay of Edward? or is he just awaiting developments?  Northumberland and Oxford advance down the hill to confront the Yorkists.  Clearly Ian has decided that victory needs to be won in combat before Exeter's betrayal affects things.

Northumberland advances off the high ground

Game Turn 9
This time the Yorkists have pulled a treachery card - Warwick has changed sides and is now leading his column towards the nearest Yorkist force with the intent to attack it.  The treachery cards having a freak selection this turn (they are picked at random each turn) means that the reinforcements for each side has effectively gone over to the other side!  I decide that Edward has to do something drastic.  Edward declares a do or die charge on Oxford with his men-at-arms/billmen block supported by his mounted men-at-arms. A more general melee develops as Northumberland supports Oxford.  There must be something like 300 figures locked in combat!  Oxford and Northumberland get the worst of it and give ground disordered.

The view behind Oxford's men just prior to Edward's charge which bowls them back

Edward's men-at-arms leading the billmen into the attack

Game Turn 10
It nearly being 2am it was decide that this would have to be the last game turn in what was turning into a really dramatic battle.  Edward charged into the Lancastrians again.  The melee was brutal, and which actually caused an automatic break of the Lancastrians by the number of casualties inflicted above their shaken score (I only realised this after the game, and instead performed a normal break test for the Lancastrians which led to them being pushed back again...darned fatigue!).  Edward led the attack and he survived being killed by a score of 9 when a 10,11 or 12 would have done for him!  We declared the game a draw.  Edward had not quite achieved his objective of taking the bridge, though Exeter (and his Lord Stanley-esque sitting on the bridge without moving) could have been judged to have taken it for the Yorkists, especially as Edward would probably have reached him in the next turn (if he rallied from his own losses).

...And so ended an absolutely terrific game.  It had everything, plenty of drama and a thorough testing of new elements of the rules we had introduced.  The only shaky thing was both sides getting affected by treachery.  This will be changed by an amendment.

The War of the Roses special rules introduced were as follows:

Treachery: A single card is drawn by each player at the beginning of each turn. If the card is a Jack then a D6 must be thrown. 
1 or 2 Brigade turns traitor and is taken over by the opposing player
3 or 4 Brigade halts and plays no further part in the battle - merely observing and watching and waiting...!
5 or 6 Brigade continues unaffected.

I left all 4 jacks in the pack thinking it would be unlikely to hit one, never mind find two!  I shall take three out next time and leave just one in the pack.

Ammunition Supply: An average dice is thrown at the beginning of the game for each missile unit. The number is recorded as the number of arrows/handgun ammo/artillery shots/crossbow bolts allowed to be fired by each unit in the game.  Counter chips are handed in each shot to show stocks.

Wind Direction: This adds 4" to arrows. Dice on D6 at beginning of game for wind direction
1 from North
2 from East
3 from South
4 from West
5 or 6 No wind

Movement and Firing 
Archers move a max of 2 moves and still fires
Crossbows move a max of 1 move and still fires
Handgunners move a max of 1 move and still fires

Artillery Explosion Risk
Gun explodes on firing if an explosion risk dice (a warhammer explosion dice - one side only marked as explosion) appears with an adverse roll.  The explosion risk dice is thrown each turn with the normal shooting dice. If the explosion symbol appears, examine the other dice.  If a 4,5 or 6 appear on any of the other dice then the gun has exploded. If only 1,2 or 3 has appeared then the gun has misfired this turn.

'Housecarl' Rule
This is a rule introduced for my Saxon armies for housecarls fighting in the front rank of Fyrdmen.  I have included Men-at-Arms on foot to be part of bill units. These will fight in the front rank as befits their status.  The unit thus fights using Men-at-arms stats.  However this reverts to Billmen stats as soon as the unit becomes shaken.  Even in if the unit rallies, it remains as billmen for the rest of the game.  Place the men-at-arms behind the billmen to signify this.

These additions really helped the game.  The battle was able to flow, yet was affected and influenced by factors which really made an impact on War of the Roses battles.  For instance, when arrow supplies were shot out, then the bowmen retired behind the billmen/men-at-arms and they could be forced to advance to contact quickly if losing men to an enemy arrow storm.

It was also interesting to fight a War of the Roses battle without being in the typical 3 vs 3 blocks facing each other for a grinding battle. The scenario allowed a different sort of battle to develop, with lots of challenges for the commander, but one which still felt suitably medieval and was without doubt, very enjoyable to play. 

I can't wait for the next game! 


Monday 14 October 2013

Going Completely Medieval! (Plus a game report...a blog bonus!)

...Nope not a weekend spent in Luton but a change of period.  As ever, I have returned to another one of my historical interests which has been too long dormant.


I painted my Wars of the Roses armies between about 1998 and 2000.  I remember that I spent 2 years immersed in that period without leaving it to paint a figure of a different era during that time. I haven't done that before or since!  I tend to go in cycles of 4 to 8 months or so before, like some time traveller, I land in a different era (hopefully one for which I have books and figures for already...or it gets expensive suddenly!).

Until last month I was re-painting my Prussian 1870 army when I just about finished and was about to start on the French when I just decided to have a look at my long neglected Yorkists and Lancastrians.  The French are now under their bubble-wrap dust cover and taking a rest as Medievals took precedence!  The enthusiasm just bit me like that!

I only played with my Wars of the Roses Army once before.  It was a game using Warhammer rules around 2004 with two potential new gamers.  Unfortunately the masses of dice throwing for hordes of archers and the slogfest of erosion just didn't seem to do it for them and enjoyment seemed minimal.  One them since has returned for WW2 games.  Clearly manoeuvre and short punchy actions are more to his liking. I couldn't blame them. Even I had found it dull and I had just devoted 2 years to building the armies up!  So into hibernation the troops went...until now...

The giant re-basing session under way

I have done a lot of re-basing and re-organising in the last two years.  My wargaming has increased as I have found rules that have made playing so much more enjoyable.  More wargaming playing time (increasing ten-fold!) with my regular opponent, Ian, has meant that I've allocated more resources and effort to something I'm really enjoying.  This has co-incided exactly with reading blogs and blogging.  So I blame you all for my increase in spending!

2011 was the year discovering the rule set 'Hail Caesar' which led to my re-basing and re-organising my Imperial Romans and Ancient Britons (and my first blog posts). 2012 was Pike and Shotte and the not inconsiderable effort of re-basing my English Civil War collection. Now my even bigger collection (near on 500 figures) of Wars of the Roses troops was going to have their day.

Work in progress - MDF bases for all troops!

A good sized parcel of laser cut MDF bases from 'Products for Wargamers', A large bag of builders sand and brown tubs of Acrylic paint was purchased from B &Q for basing texture. This was lot cheaper that that old Basetex stuff I used to buy once.  I purchased more plants and grass tufts than contained at Kew Gardens for a goodly sum at Colours at Newbury in September.

The mountain of old bases next to a mounted man-at-arms for scale

The re-basing has taken exactly a month so far.  The work has been even more intense than I expected.  With two jobs and other things in life going on, I have done probably too many late nights doing this re-basing until 3am!  I have even tried squeezing in 15 minutes or so before dashing off to work in the mornings.  Obsessed...what me?!

Fauconberg's Yorkists advance

The re-basing isn't quite complete yet. The troops are all on MDF bases and basing texture has been applied.  I have completed about half of the stands now with the full 20 stage painting/planting process ( I type up all my painting/basing processes in case I forget a sequence!).

A Game report - Sneaked in at the end!
One incentive for all the work was preparation for the game I played last night with Ian.  The board layout was based roughly on Tewkesbury. The rules were Hail Caesar with a few modifications and game additions.  Archers were allowed a max of 2 moves prior to fire. Crossbows and handgunners were allowed one move and fire only.  Arrows sheaths were diced for using an average dice,  i.e a 'two' on the average dice meant the archers could only shoot for two turns (the blue counters shown in the above photo).  This could influence tactics. Few arrows to fire would encourage coming to grips sooner.

Wind direction was also diced for. A wind from behind would increase archery distances for that side by 4 inches for the entire game.  In this game however, the dice decided that wind would be nil.

 The new MDF bases, textured, painted and planted

There was also the possibility of one side receiving reinforcements. The pre-game brief stated that the scouts of both armies had reported a battle going on some miles distant. This was the clash of both sides reinforcements. Only one side would possibly benefit from their arrival depending on the victor of the off-board clash.  This was decided at the end of each turn by the drawing of a card. A royal card would signify their arrival. The highest D6 would decide on who's side.  The cards were an online purchase last week.  I decided that if I was going to use cards then I wanted medieval ones. I was overjoyed to find a set of 15th century copies! The purchase was immediately made. Small details like this really add something for me.

What better way could there be to decide on reinforcements? 15th Century cards

I'll summarise the rest of the game as I've gone on long enough!  Both sides consisted of the standard 3 battles facing each other as an encounter game. I played Yorkist with Edward IV as my commander. Ian had the Earl of Oxford as his commander. Both commanders were in the thick of things throughout.  I had planned to play on the defensive but my arrow supply was minimal so I decided to send my wings forward. Edward's wing bounded forward well, but Fauconberg's men were less willing. Ian advanced his forces and after the arrow-storm, the billmen and men at arms clashed.  One of my archer contingents failed to move out of the way quick enough but held out well against Oxford's wing. I supported my archers (fighting by now with buckler and falchion) with billmen and men at arms behind them. Oxford himself was wounded.

On my right wing Edward led his wing forward and they successfully defeated the crossbowmen of the Duke of Exeter. They forced back Exeter's wing for several turns before, horror of horrors, Edward was struck down!  The following turn led to both sides retreating their opposing wings due to all of the units being shaken on that side of the board.

The centres engaged in an archery duel which continued until the end of the game.

Fauconberg and Oxford locked in bitter combat

Conclusion
This was one of those games that needed a day or so to reflect on.  The game itself was interesting as it seemed to reflect a typical Wars of the Roses battle very well;  Archers cancelled each other out, the infantry attacked each other and after a really hard grinding battle, units wore down and commanders were killed in the centre of the press.  But there was little manoeuvre, no blitzkriegs, no tactical outflanking surprises as 'Black Powder' delighted us with.  But then again should we have expected that in this battle?  The hard grinding combat was at is was historically. With two sides of the same troop types, the rules did very well in making it very realistic. It wasn't the most exciting of games though.  I shall have to devise some interesting scenarios or perhaps look at varied troop types or pick more interesting battles (such as Northampton or Bosworth or Stoke Field) where different or exotic troop types or treachery could play its part.  

The little touches like using cards for the possibility of reinforcements (who didn't actually show up after all in this game) and dicing for wind direction and arrow supply helped to make it interesting.  The Wars of the Roses would make excellent campaign games so that is another route.

So unlike last time, I will be continuing with my work on the medieval armies!

Monday 16 September 2013

Black Powder - French Indian Wars Revisited

On 24th August Ian and I had another game of Black Powder for the French Indian Wars.


With the success of the previous game (and another which I have completely failed to write up!), we decided to have our third French Indian War game in a row (there is a 4th planned for next weekend!).  I think this is a good illustration of how much we are enjoying gaming this period with this set of rules.

Now I must confess to having been quite dull with my scenario setting for many years now.  I think the reasons for this were that gaming opportunities were rare until this year,and time minimal.  With these constraints  I tended to just set up the board for a meeting style engagement.  After having been inspired by so many of your blogs and your after action reports, I decided it was time I was a little more imaginative.  I was also encouraged by feeling very comfortable with the Black Powder rules and confident that we could reach a conclusion to a game within the 4 or 5 hours we had to play it in.

I decided to start with all figures off board to add an air of uncertainty.  Further, instead of having just the objective of beating the enemy's army, I set a simple scene around the forthcoming battle.

Scenario
A British supply column is approaching up the road which runs North to South up the board.  This supply column is intending to reach a fort up the road the following day.  The British have troops in the area who have been tasked with securing the area of the road, cutting trees and protecting the column.  The French with their Indian allies are already aware of the approaching column and have moved into the area. They intend to drive the British out of the area so that the supply column can be attacked.

The arrival of the first British Brigade in march column

Deployment
A British Brigade will enter from the North in march column and head down the road to the South. They have an artillery piece with them which through misfortune is having to be manually dragged.  The French are permitted to bring a 'light' brigade of Courier de Bois and Indians in the centre of the board in the woodland. Entry to the battlefield area for more brigades is only permitted by dice throw beating command values in following turns.

Forces
Three Brigades per side, with a variety of between 3 to 5 units Battalions per Brigade.  I should point out that Ian had painted some superb Seven Years War Russian Infantry this week and we both agreed that they should be allowed on the table.  They are French Infantry who unfortunately washed their white coats with some French soldier's green underpants - which caused a 'dye incident'. Hence greencoats on French side!

Rule Amendments
All of the previous rule amendments were adopted again, but with one more additional rule change to the normal Black Powder rules.
This time we said that charges can no longer be made on initiative by units within initiative charge distance of the enemy.  The reason for this is that it seemed bizarre for a unit which has been chewed up by musket/artillery fire to be allowed to automatically charge home.  Surely they must check for forward movement of some sort?  After all many history books do state that charges were frequently shot to standstill before melee contact was made - look at all those French column vs British line situations and those American Civil War Battles (ok better rates of fire etc I agree).  This rule change was very satisfactory and made a lot more sense.  We decided that a unit had to check for movement against its command value just as if it was going to make a normal movement.  However, retirement movement could be made on initiative as per the rules.

Game Turn One
The British advance slowly up the road.  French brigade is in the wood.  No other actions.

A slow but steady advance on Game Turn One

Game Turn Two
Not much action so far.  The French await developments before doing anything. The British move slowly up the road with the one brigade

Game Turn Three
The French deploy Montcalm's brigade in the centre and their last brigade right at the south end of the board.  Suddenly things are happening!

Montcalm's Brigade enter at the centre of the battlefield, threatening
 to cut the road almost immediatly

The two remaining British brigades deploy in the centre to try to rescue the brigade in march column.

Game Turn Four
The French central brigade cut the road and block the British march column.  All other French brigades march towards the action. The British realise their situation.  The march column halts.  A British brigade heading towards the French fails to move! This is bad news as the column is looking particularly vulnerable.


Game Turn Five
The French southerly brigade makes a triple move and starts to head towards the action.  For the British this looks critical.  The room for manouvre looks smaller and the French have taken the initiative in all areas.  The view of the battlefield seems to be shrinking already. Things could turn into a desperate holding action...unless something drastic is done quickly.
The British announce a charge in the Left centre...a great dice throw gives a triple move.  The British Louisberg Grenadiers and 78th Highlanders perform a wild bayonet charge on the Courier de Bois.  In the ensuing melee the Courier de Bois lose their 3 x stamina level plus an extra 4 men. This results in them being removed from the board. Standing to take a charge from Grenadiers cost the French dearly.

The desperate British bayonet charge destroys the Courier de Bois
 who flee through the woods and beyond

Game Turn Six
The remaining units in the French brigade deliver musketry and disorder both the Grenadiers and the Highlanders.  The British move up their central brigade to take on the French Northern brigade who cut the road earlier. The desperate British move to throw their men straight into the action to rescue the march column has had the effect of gaining local superiority of numbers...if the French Southern brigade can be delayed coming into the action.  The British march column try to extricate themselves from the road and withdraw into a fighting formation.

Montcalm's central brigade is held and a withering fire from superior numbers creates a killing zone for the Russians  ahem! Frenchmen!

Game Turn Seven
The French on the Southern flank start to make progress and there is a real danger that they will come around behind the British Centre.

British skirmishers exchange heavy fire with the Indians.  The British who were on the road have managed to pull out and reform and are currently marching through the woods on the Southern Flank.  The French have a new threat to deal with as they are currently engaged to the front.

A dramatic shift in fortune.  The French brigade is being volleyed to its front while the previous march column has sorted itself out and is now lapping around on the Northern flank (right top edge of pic), the French desperately extending the flanks to hold them.  The artillery is now proving it's worth delivering shot straight down the bridge!

Game Turn Eight
The French realise that things are going against them and carry out some desperate actions.  The Indians charge the 80th Foot and a melee of hatchets and bayonets between the skirmishers ends in a draw for this turn.  The British volley fire breaks the Francophile Russians in the centre!  The British continue to reach out around the Northern Flank, giving the French a real problem.


Another view of the glorious action unfolding.  The French are brigade is being surrounded.  The red counter on this Battalion symbolises that it has yet to carry out it's devastating 'First Fire'

Game Turn Nine
The French carry out assorted volleys. The British successfully turn about a battalion on the Southern flank to fight back to back 'Glosters-style' to hold off the encroaching French.  Fire shakes the 78th Highlanders.

The British hold off the French by fighting back to back

The critical point...The British pour enfilade fire in and advance with 3 battalions
 in to the struggling French Brigade


The British deliver enfilade fire on the French Companies de la Marine who become shaken.  The Indians break under terrific volley fire.  A French brigade breaks and runs....

...and that's it, all over.  This was mainly due to the time being close on 2am!  I think my adding abilities were fading by this point, but neither Ian or myself wanted to wind up a superb game.  I would go as far as saying it was the best wargame I have ever played. This isn't because of the result (my win!) but because of the way the battle developed, causing interesting challenges to both sides but in a not wholly unrealistic way.  It was also satisfying to see the way the game formed because of our responses.  The clear table at the start of the game allowed a picture to develop as we responded to threats. It was really a case of thrust and parry!  

The battle lines remained constant even though we both had to refuse our flanks at opposite ends of the board. The battle was really up when one French brigade ran and another was in trouble when the enfilade fire of the British created a gap which allowed them to march three battalions into.

It was another success for the 'tweaked' Black Powder rules.  Truly a most enjoyable game.


(Ps.  While i'm actually writing a blog update for the first time in ages, can I just say it was good to meet Simon from the 'Big Red Bat Cave' blog at Colours at Newbury today.  Simon had a terrific looking Roman Civil War battle set up which was amazing. So if you are reading this Simon, a big thumbs up for what must have been one of the best games at the show)  :-)