Sunday, 27 May 2012

Ancient British Cavalry

Here are a few pics of my latest completed project.  This time Ancient British Cavalry (or 'Celtic Cavalry' as they are sold as by Warlord Games).  I have a small number of unfinished Ancient British Cavalry from different manufacturers, but these are my favourite and I will just carry on with these ones for any future units. They just have that atmospheric feel and look about them which just seem right for wild tribesmen.


The figures come as a mix of metal and plastic parts.  The ponies are metal and the riders legs are cast to the ponies.  The advantage of this is it means no difficulty in rider placement.  Trying to use pliers to open riders legs enough to fit on their horses just isn't an issue with these as it is not necessary.  There is also none of the 'camel rider' effect of when a manufacturer decides to cast a figure onto a saddlecloth which then needs to be glued to the back of the horse.  Sometimes this adds an unfortunate and ugly amount of height to the rider, making it look more like a camel corps rider!  However there is none of that with these.


The plastic upper halves of the bodies are the same as those found as a sprue in the Celt Infantry packs.  This works perfectly well and they fit nicely to to the lower bodies, with the degree of forward, rear or side lean being dictated by the modeller.  If you want the figure twisting to lob a spear than you can.


I think the ponies are quite nicely sculpted.  I was painting some others by another manufacturer (which shall remain nameless) but the shire horses (for that I am sure is what they were!) repulsed me.  They just looked wrong, very wooden, eyes in the front of the face and more like comedy versions of Victorian rocking horses. Despite having painted the riders first I found I couldn't go on with them.  The ones in these photos, however, were a joy to paint.  I used the internet to find Google images pictures of dun and bay ponies to attempt to get the shades correct. I'm very pleased with the way they have turned out.

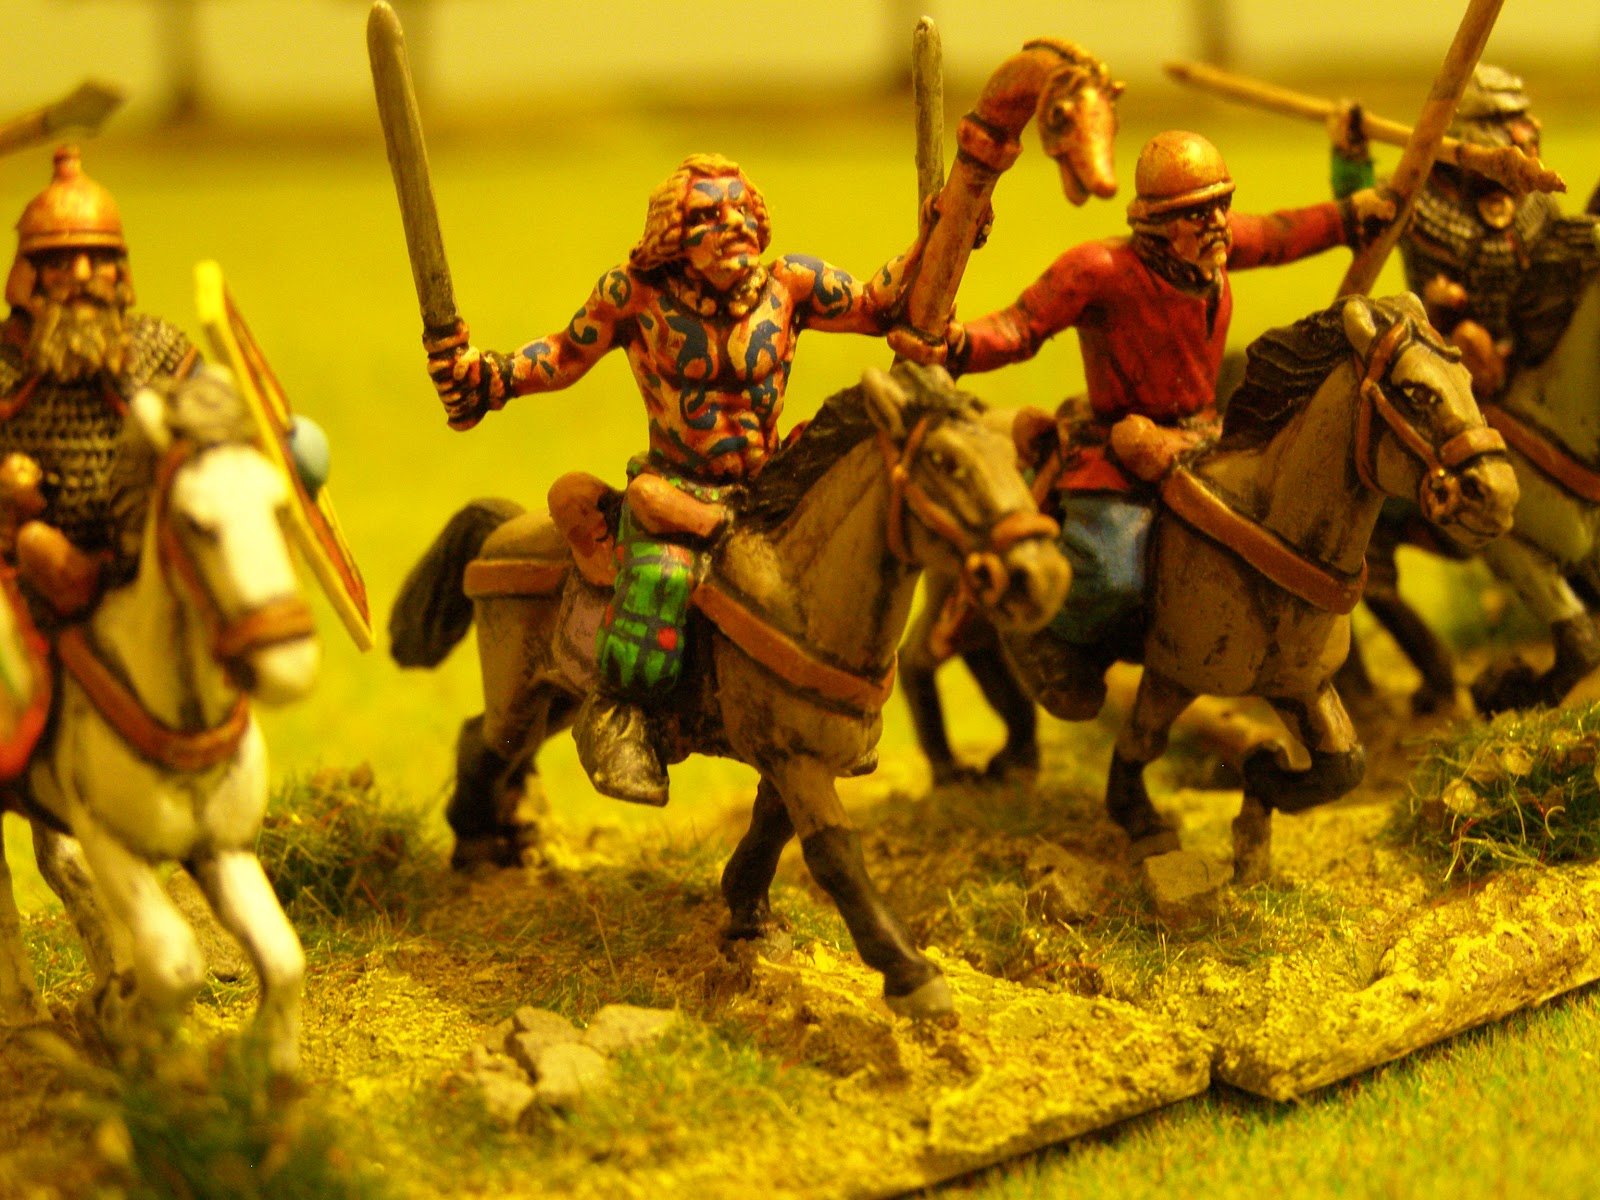

I'm still experimenting with the photography. I try to use flash where I can but it keeps putting a curved black shadow of the camera on the lower edge of the photos.  I think I actually used the auto setting this time with a Macro Mode on for most of the above pics.  Any advice how I can improve would be much appreciated!  

These Ancient British Cavalry will be providing fast close support to my chariots in future games of 'Hail Caesar' and much used they will be!


It's funny but I really went at these with enthusiasm to complete.  Initially the main reason being that my new 'Pike and Shotte' rules had arrived and I was keen to change history periods after 7 months in 1st Century Britain.  As work progressed, I found my keenness to complete this cavalry unit forged by the sheer joy of painting these figures.  When you find yourself at work wanting nothing more than to get home and paint because you are enjoying your current subject matter, then that surely has to be a good sign of a worthwhile project.  

We will have to see what I paint next. I am inclined to make that time travel leap now.  Two books on the English Civil War ordered from Amazon this week will probably push me to re-organising my ECW armies. Still it's nice to have spent this year so far with a re-organised and refreshed Ancient British Army. It has been quite an obsession this year, but definitely worth it.

Monday, 23 April 2012

Battle Report!

This is the record of a game played on 7th April which I have only just got round to downloading the photos for (shame on me!).  It was a game of Ancient Britons versus Imperial Romans with Ian taking charge of the Romans and me all woaded up in charge of the hairy ones.

Rules used were 'Hail Caesar', a set which I have had for a few months and just have not been able to put down.  My previous blog posts probably give a good indication of how much they have inspired me!  

The board was not too cluttered with scenery.  It's still early days as far as playing goes.  This is the third game played with the rules and i'm still making mistakes but only one or two now.


Turn One
Please excuse the slightly odd angle - I was trying to get as much of the board in shot as I could.  This shot was taken just after the advance of the Ancient Britons.  I threw to go first and decided to go for it in the proper Celtic manner....charrrrrrge!!!!  I also wanted those charge bonuses and to seize the initiative early on.  For ease of reference I shall refer to North, Centre and South of the battlefield.  North is the window end where the delightful floral curtains hang.  Both forces were arranged in three divisions each.  The Roman's having a particularly strong centre of 4 Legionary Cohorts and a unit of Scorpions.


A closer view of the centre of the battlefield.  The scorpions are putting fire down on my chariots attacking on the Northern flank of the battlefield.

A view of the Ancient British advance on the Southern flank.  This advance was hampered by orders problems and as a result advanced too slowly.

Turn Two


I sent my two chariot units hurtling in on the Northern flank.  Ian countered with one unit of auxiliary cavalry. The battle here was fast and furious and very bloody.  The result was that the auxiliaries and the front unit of chariots broke each other.

The remaining British force on the Northern flank.  Only one unit of Roman Auxiliary Archers deployed in skirmish order stood between them and the Legionaries exposed flanks in the centre of the field.

The centre prepares for the coming clash!

Turn Three
The British Warband smash straight into the Roman Legion Line. Dramatic stuff!


The Army commanders throw their weight into the combats on both sides too.  The outcome of this attack would have such a bearing on the whole battle.  History says that attacking Roman Legion in this fashion was usually suicidal.  However, when you have a big force of warband who are facing the Legion, you just don't want to sit back and wait for the Romans to come marching on.  The temptation to just go for it and break that shield wall is just too great....


Though as Wellington was later to say...they came on in the same old way and they were beaten in the same old way...and that's just what happened to my Britons!  The scorpions beat off one unit with accurate and very deadly fire causing a break test prior to the point of impact.  The very central unit was broken and my Army commander wounded.  My left unit of the central division was defeated and was then contacted in the rear by a sweeping advance by the Romans.  This broke that British unit too.  The only upside in the whole of the central combat was that the Roman Army commander was wounded also.

Turn Four
The Britons need to turn the battle around here and fast!  With the centre broken they had to win on both flanks to have any hope of winning the battle, and to do it before they became engaged with the bloodied and victorious Legionaries.

On the Northern flank a charge by my chariots was finally made despite poor order throws.  This tardy attack made contact with the Roman skirmishers.  Breaking through should have been easy.  But NO!  The Roman's had some amazing dice luck and held, forcing the combat to continue into the next round.


On the Southern flank my division of Britons finally got moving properly and charged the Roman Infantry Auxiliaries.  This attack was looking much better.

Turn Five
On the Southern flank my successful British division manage to break the Roman Auxiliaries, killing the Roman divisional commander. Now if I can just repeat the success on the Northern flank, I can pull victory out of defeat....But no, the skirmishers hold for another round of combat and keep my chariots hemmed in...

Ian moves his victorious Legion into the exposed flanks of the chariot unit.  It's all over. The chariots are reduced to mangled wooden wreckage and bodies.  My successes on the South flank at least save face for the Ancient Britons, and they flee the vengeful Roman Army to fight again another day.  There is no escape from the scale of defeat though.  Ian won a good victory, though it was only really certain in his move in Turn Five.

I think this is the third time Ian has won out of the three times we have played Hail Caesar...I still enjoy it though. The battles have all been hard fought and great fun with lots of laughing at some of those good and bad throws at just the critical moments.  (Hang on, I've been beaten three times out of three games...it's Franco-Prussian War next time and I've got the spikey helmet on!).  Actually I will get back to other periods sometime, but this one really has me hooked at the minute. We will have to see what is going to come off my painting table next!

Friday, 6 April 2012

Ancient British Commanders...Caractacus and Cartimandua!


After my recent posts of the warriors, this time I bring you the commanders!

It's taken me a little while to get these stands done, but I wasn't sure what I wanted to achieve with the basing initially, and I wanted to try out new things to make them more interesting.  Instead of my traditional single stand figures for commanders I wanted to go for a stand to show the main man (or woman) himself plus the interesting characters who the Chief would have surrounded themselves with.

 I decided to use a steel circular base to avoid warping and build up basetex-type material so the stand could actually be picked up.  The steel base was 1mm which seemed a good idea before I saw them but picking it up off the board was hard work!  I built up the edges and gave them several layers of acrylic paint to stop the  newly build-up base-tex edges from eroding with handling.

So without further ado...more pictures...


The command stand of Queen Cartimandua of the Brigantes tribe.  I actually painted Cartimandua about 12 years ago using enamels.  As I had to paint her new subordinates I decided to give her the acrylic paint treatment too and give her a bit more life.  The old enamel paint did look very tired on her. It could be said that it may have been more realistic, a little more faded fabric perhaps would have been the correct look, but she is a Queen after all, so nice deep powerful colours were added with acrylic and I think she looks more regal for it.


Now this next figure could be Vellocatus, who she divorced Venutius for (and devastatingly split the tribe).  I originally planned to have the big chap on Caractacus's stand holding a Roman head, as her fellow.  But as I was painting them up it suddenly occurred to me that as she allied her tribe with the Roman's, why would her new man be holding a Roman head!!!  A change of husband's was required (again!) and so I gave her another  British Chieftain to be Vellocatus and gave him an Ancient Brition's head to hold, more indicative of the inter-tribal wars the Brigantes found themselves embroiled in.


Her Standard-Bearer,


...And this wild fellow below who looks like a particularly dangerous member of Cartimandua's hierarchy.  A Druid who appears he could put the frighteners on any tribal member!


Using the Hail Caeser rules I will use these larger bases as Army Commander stands.  I will use smaller two man stands as my standard Divisional/Tribal Leader Commanders.


I also painted up the stand for Caractacus.  Needless to say I had to keep him away from Cartimandua seeing as she chained him up and handed him over to the Romans when he sought her help when his rebellion failed! The figures on this stand are a mix of Wargames Foundry and Warlord Games.


The large chieftain holding the Roman head is in scale.  He is just meant to be a very big bloke!


..'And now for my next trick!'


The standard bearer and a shot from the rear of the stand.


As you can probably tell, I really enjoyed painting these figures.  I also enjoyed spending more time with the basing too.  It's not just the painting. As I'm sure you find, the more you paint the more research you do and the more enjoyable the hobby is as a whole.  It's through painting Ancient British wargames figures that I found that I live right near the border between one tribe who allied itself to Rome (Dobunni) and one who fought against it (Catuvellauni)  I must cycle through that troubled border land each time I go to work every day.  It sets the imagination going somewhat to think of what must have been happening in that very area all those years ago.

Wednesday, 29 February 2012

Ancient Britons!


This is what I have been doing since my last posting just over a month ago.  These are the Ancient British Warriors by Warlord Games.

I love the colour and sheer spectacle presented by a box of these chaps.  There is a feeling of forward momentum and lots of energy.  No tidy ranks with ramrod spines and wooden poses - these guys are really going for it and their faces and bodies really demonstrate it.

The leading fellow in the photo above is clearly moving too fast to be more than a blur (nothing to do with dodgy camera work at all!).  I nearly didn't use this pic but I like the way the figures behind are brought into focus.  The difference between the 'Celt Warriors' and 'Ancient British Warriors' pack is 10 extra figures in the latter, and a pack of metal heads with the limewashed spikey hair mostly and metal command figures as well as round shields, which must be rarely seen on Ancient British wargaming figures.  Indeed, it felt a bit strange putting them on the figures so I kept the rounds shields minimal.  There seemed to be many more shields in the latter pack than the Celt pack (which I remember was very disappointing in their lack of numbers).  I prefer to see all my troops properly equipped and armed rather than looking like they have discarded their shields due to having been 'pilum-ed'!

I have always had an aversion to painting tartan. Highlanders' kilts cause me much grief. Those straight lines and patterns I have always struggled with.  I was determined to make more effort with these chaps as it seems that tartan patterns are such a represented part of their whole make-up.  The overall effect turned out to be quite pleasing to me, but I still wouldn't want to do it too often!


The blue woad body painting is always fun to paint.  Sometimes I find myself not wanting to put the paint on, especially when the skin tones have worked out particularly well. In the cases where clothing was off, I decided that the bodies had to be decorated, again to build up their sense of character.


I hope these close ups demonstrate what I mean about the sense of character.  As you can probably tell by the number of photos I have put up, I really enjoyed painting these figures.  I can't wait to see them on the board added to the developing horde that are my Ancient British Tribes.  Playing them with 'Hail Caesar' rules is great because you have to use them in four ranks and the force just feels right. When a unit has supports either side and behind it just looks great to see horde of over a hundred of these warriors charging in, faces grimacing, wide eyed, shields in the air and looking just plain wild!

A few last pics to finish off with.


I included a couple of Roman shields too.  I imagine that captured booty would be re-used and no doubt used to taunt their enemy at the next confrontation.  I hope you enjoy looking at these figures as much as I enjoyed painting them.